Azure Machine Learning Studio#
- User needs: Data visualization, Data sharing, Data preparation, Data processing
- User profiles: Data Analyst, Data Scientist, Data Engineer
- User assumed knowledge: Basic concepts of machine learning and data analysis, experience in python coding.
Azure Machine Learning (ML) is a platform for operating machine learning workloads in the cloud. With the Azure ML Studio, you work in a machine learning workspace. A workspace defines the boundary for a set of related machine learning assets. You can use workspaces to group machine learning assets based on projects, deployment environments (for example, test and production), teams, or some other organizing principle.
This user documentation is divided in five sections:
- Notebook feature
- Data provision,
- Model training,
- Model registering
- and Model deployment.
This user documentation provides instructions to access the Azure ML Studio assets graphically. To have instructions on accessing the Azure ML assets programmatically, we also provide a Python cheat sheet.
In order to connect to your Azure ML Studio, please go to this website. Finally, please provide your credentials and select the workspace provided to you to enter.
1 Notebook feature#
Azure ML Notebooks are Jupyter Notebooks with Python and R kernels integrated with Azure ML Studio. You can run your explorative analysis, pre-processing and post-processing actions on these Jupyter Notebooks using an user-specific compute instance (a personal Virtual Machine).
Although you can train small machine learning models on the user-specific compute instance, when higher computational power is needed, we recommend to use the compute cluster (a scalable compute resource) provided to you and connected to the workspace.
We provide instructions on
-
Creating a Notebook
-
Starting/Stopping your compute instance
-
Installing Python/R packages
related to the Notebook.
1.1 Creating a Notebook#
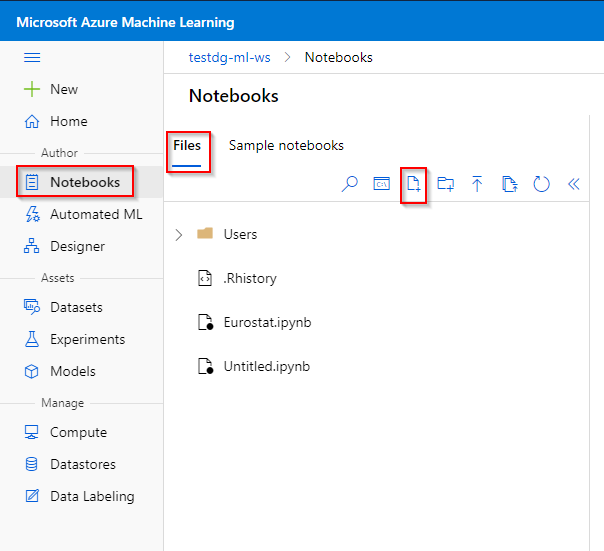
Step 1. Click the "Notebook" tab under the "Author" category
Step 2. Click on “Files”.
Step 3. Click on the "Create new file" icon.
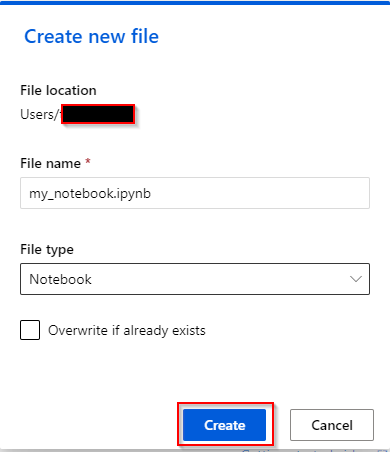
Step 4. Provide a file name and specify "Notebook" as file type. Click on the "Create".
Step 5. You should now be able to run Python or R code on your Notebook.
1.2 Starting/Stopping your compute instance#
To start-up your compute instance,
Step 1. Click the “Compute” tab under the “Manage” category
Step 2. Click on “Compute Instance”.
Step 3. Click on the compute instance that was provided to you and click on “Start” button.
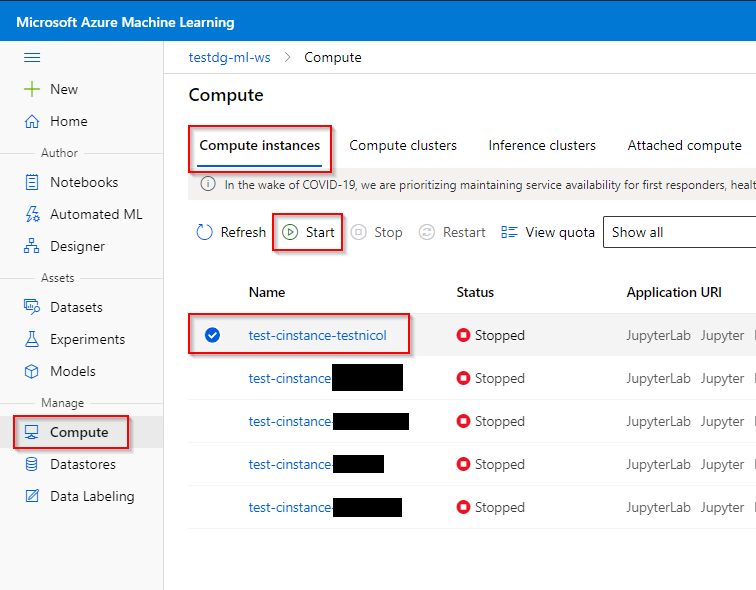
When you are not using the compute instance, please stop it again to avoid unnecessary costs. To stop your compute instance, click on the “Stop” button next to the “Start” button.
1.3 Installing Python/R packages#
When a Python package is not available by default in the Notebook, you can install Python packages by using pip install: run
! pip install <Package name>
in the Notebook.
When an R package is not available by default in the Notebook, you can install R packages by running
install.packages("<Package name>", lib="/home/azureuser")
and specify
.libPaths("/home/azureuser")
at the beginning of the Notebook. This discrepancy is due to RStudio assuming a different default library location than the R kernel in Jupyter. Please install all future R libraries used in the Notebook at this location.
2 Data provision#
Datasets are versioned packaged data objects that can be easily consumed in experiments. Datasets are the recommended way to work with data, and are the primary mechanism for advanced Azure Machine Learning capabilities like data labeling and data drift monitoring.
We provide instruction on
-
Registering a dataset from a local file
-
Registering a dataset from Data Lake GEN 2 storage
-
Registering a dataset from a SQL Database
-
Viewing the dataset
-
Unregister a dataset
A registered dataset is a dataset that is registered in the workspace of the Azure ML Studio. A registered dataset can be referenced, either graphically or programmatically, when creating an experimental run using a Machine Learning model.
Note: Currently, instructions are provided for registering a dataset from a local file, from a Data Lake GEN 2 storage and from an Azure SQL Database. Registering a dataset from Azure PostgreSQL is not in the scope of this user documentation, but more information can be found by navigating to this link. Registering a dataset from Azure MySQL Database is currently not supported by AzureML (see this link). Please consult the technical team if registration from other datastores is required.
2.1 Registering a dataset from a local file#
To register a Dataset from a local tabular file,
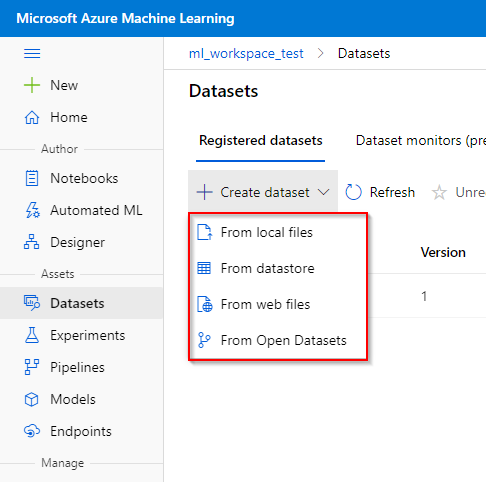
Step 1. Click the “Dataset” tab under the “Assets” category.
Step 2. Click on the “Create dataset” button and choose whether to upload the dataset from the local compute instance (from local files), from the registered datastore (from datastores), from web files or from Open Datasets. We shall give further instruction on registering a dataset a local tabular file.
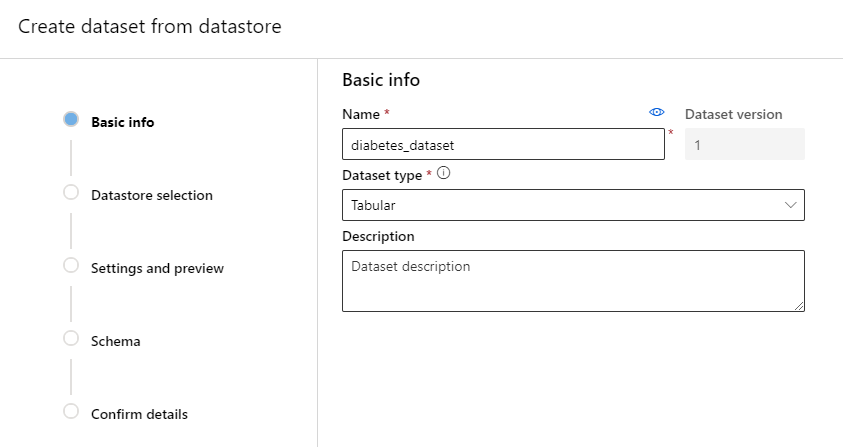
Step 3. In the “Basic Info” tab, fill in the name of the dataset, dataset type and a short description of the dataset. Azure ML Studio accept two types of datasets: Tabular (e.g. csv-file) and File (e.g. images).

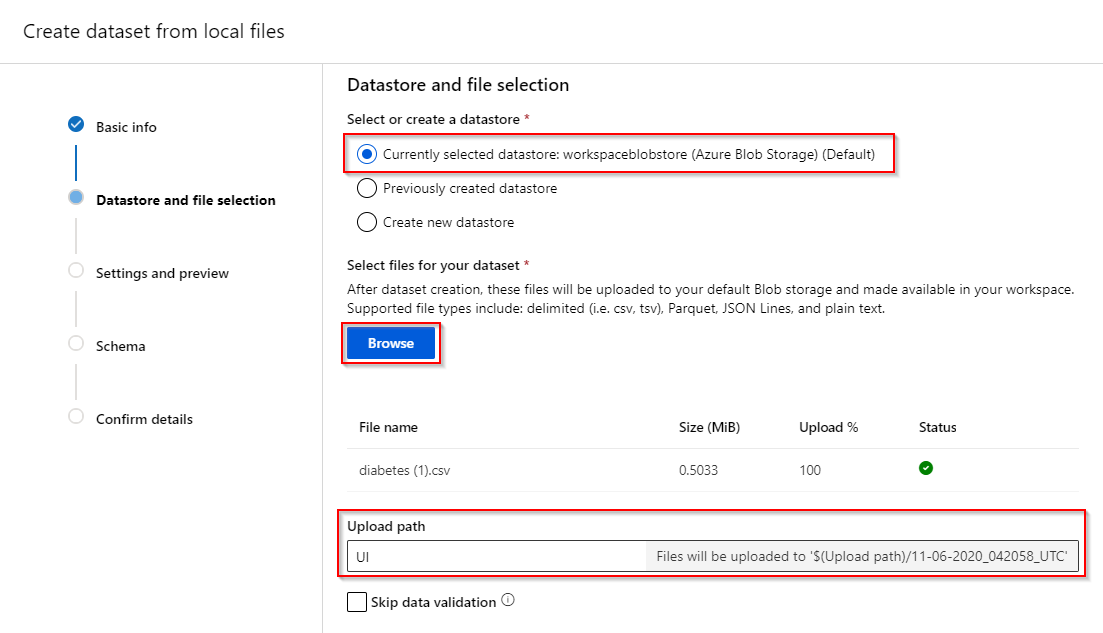
Step 4. The local tabular data need to be uploaded to the default the Azure Blob storage of Azure ML Studio. Select the datastore you want the dataset to upload to. Afterwards, browse and select your local tabular data (e.g. csv-file). Furthermore, you can specify an upload path in the Azure Blob storage. Data validation is recommended to check whether the file exists and to preview the dataset.
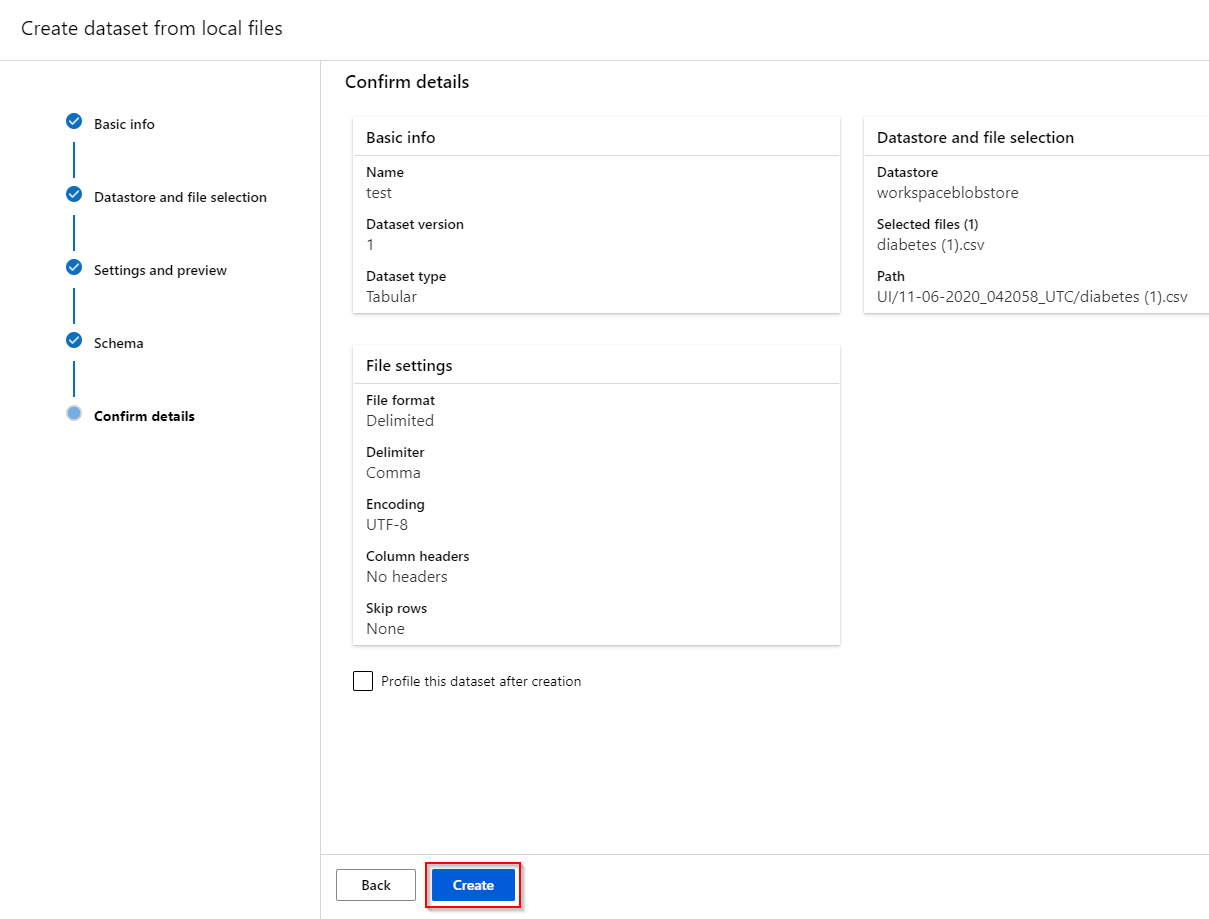
Step 5. If the dataset has been found in the datastore, the file format (delimited, plain text, parquet file or JSON Lines), delimiter, encoding and column headers can be specified of your dataset. It might be that the first few rows of your dataset can contain redundant information. If this is the case, you can skip those rows in this page.

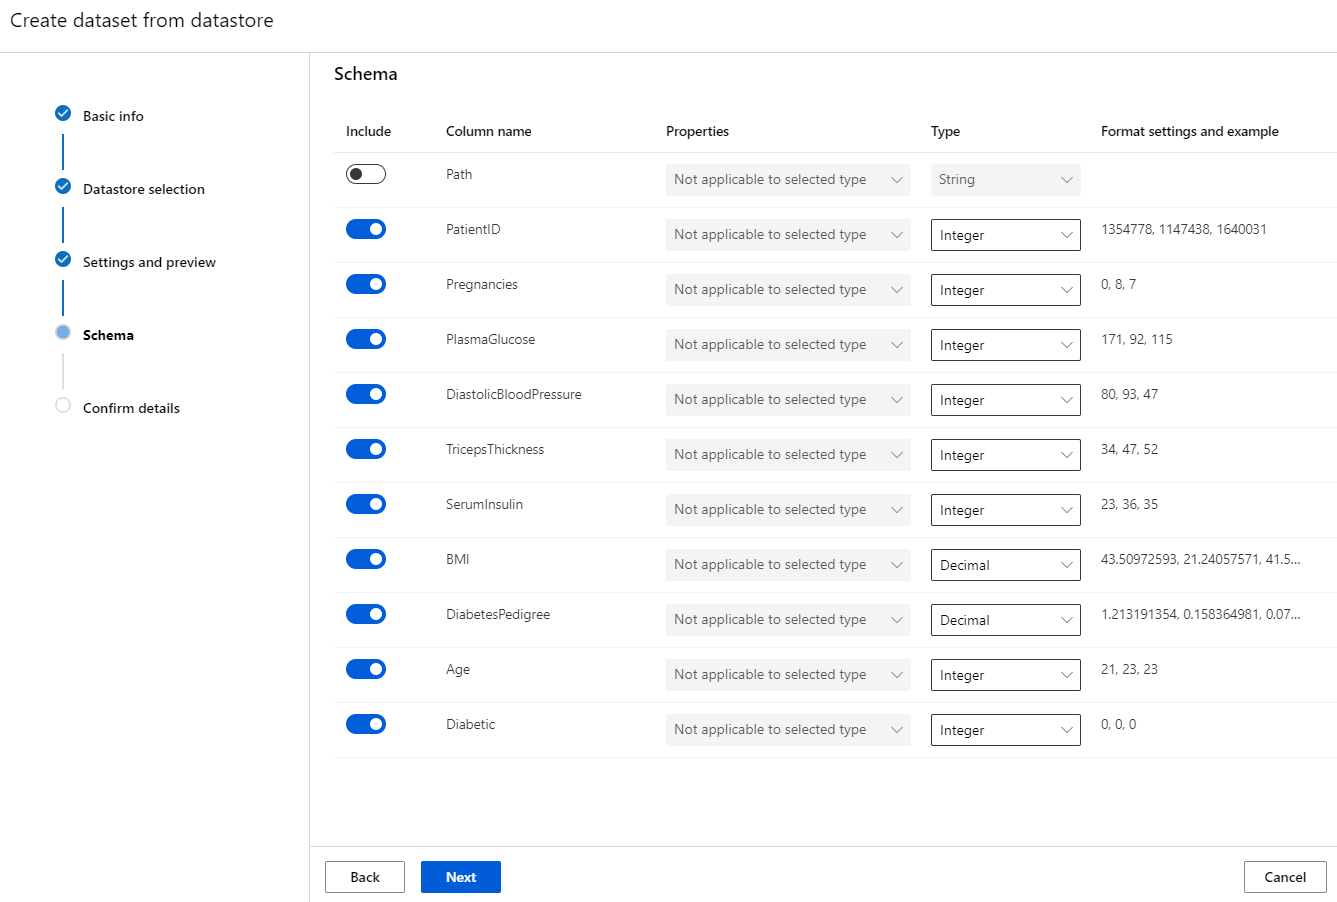
Step 6. The “Schema” tab lets you select the attributes you want to keep for analysis.
Step 7. After reviewing all the information, click on create.
2.2 Registering a dataset from Data Lake GEN 2 storage#
To register a dataset from a Data Lake GEN 2 storage,
Step 1. Click the “Dataset” tab under the “Assets” category.
Step 2. Click on the “Create dataset” button and choose whether to upload the dataset from the local compute instance (from local files), from the registered datastore (from datastores), from web files or from Open Datasets. We shall give further instruction on registering a dataset from Data Lake GEN 2 storage.

Step 3. In the “Basic Info” tab, fill in the name of the dataset, dataset type and a short description of the dataset. Azure ML Studio accept two types of datasets: Tabular (e.g. csv-file) and File (e.g. images).
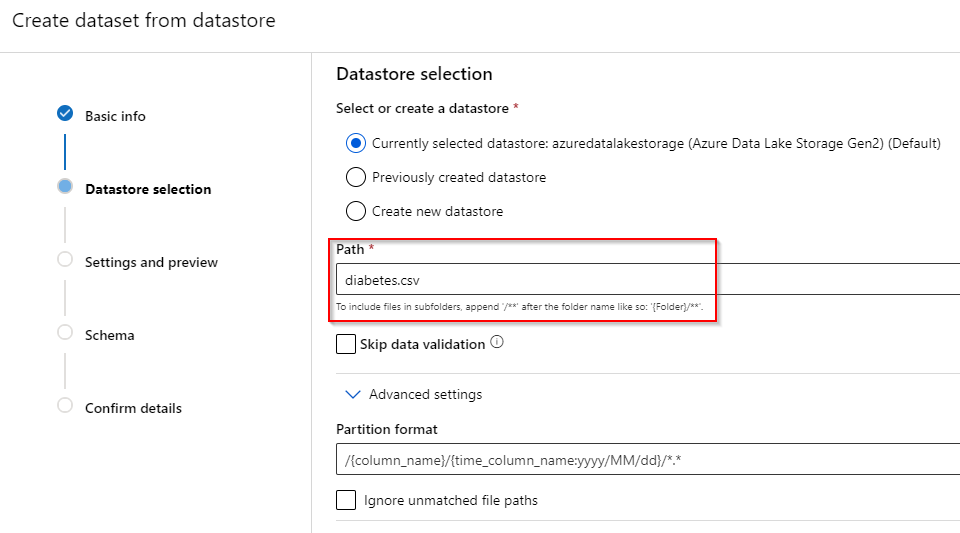
Step 4. Select the Azure Data Lake GEN2 storage you want the dataset to be registered from. Afterwards, enter the path of the database. Data validation is recommended to check whether the file exists and to preview the dataset.
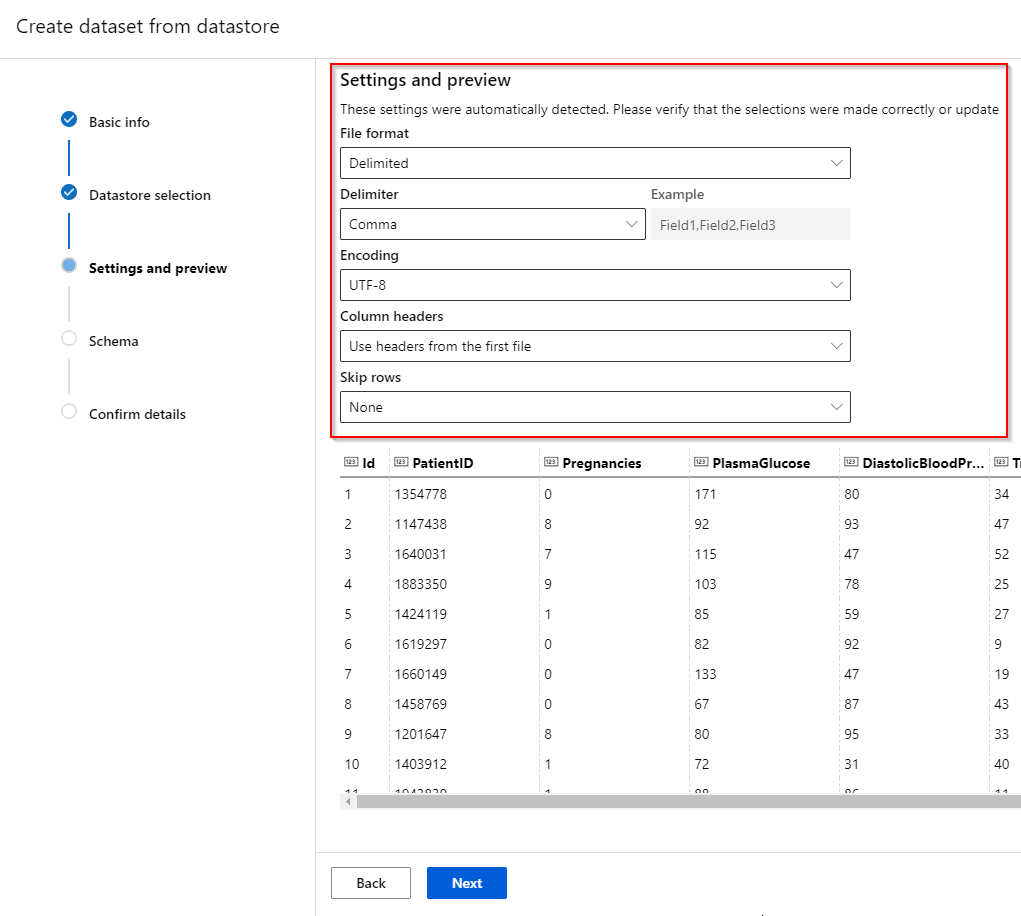
Step 5. If the dataset has been found in the datastore, the file format (delimited, plain text, parquet file or JSON Lines), delimiter, encoding and column headers can be specified of your dataset. It might be that the first few rows of your dataset can contain redundant information. If this is the case, you can skip those rows in this page.
Step 6. The “Schema” tab lets you select the attributes you want to keep for analysis.

Step 7. After reviewing all the information, click on create.
2.3 Registering a dataset from a SQL Database#
To register a dataset from a SQL Database,
Step 1. Click the “Dataset” tab under the “Assets” category.
Step 2. Click on the “Create dataset” button and choose whether to upload the dataset from the local compute instance (from local files), from the registered datastore (from datastores), from web files or form Open Datasets. We shall give further instruction on registering a dataset from a SQL Database.

Step 3. In the “Basic Info” tab, fill in the name of the dataset, dataset type and a short description of the dataset. Azure ML Studio accept two types of datasets: Tabular (e.g. csv-file) and File (e.g. images).

Step 4. Select the SQL Database you want the dataset to be registered from. Afterwards, enter the SQL query to select the dataset.
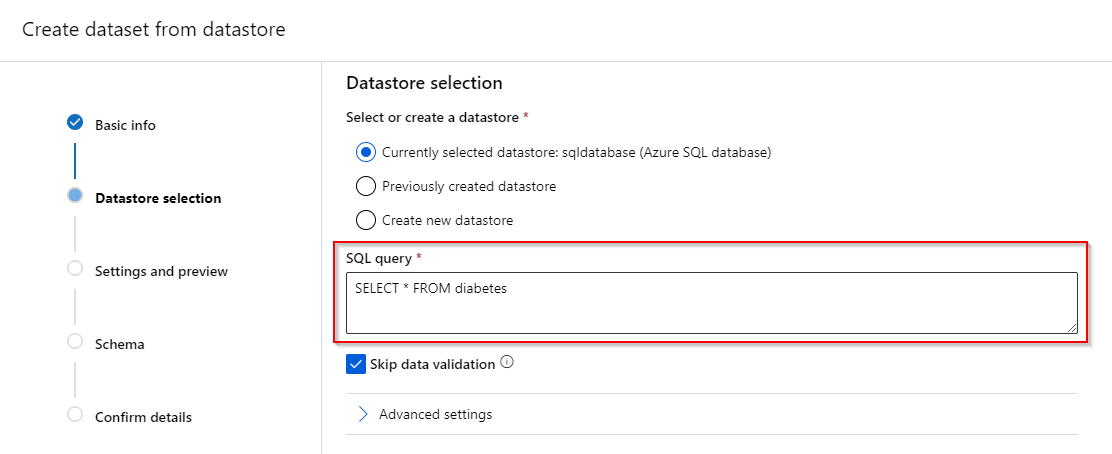
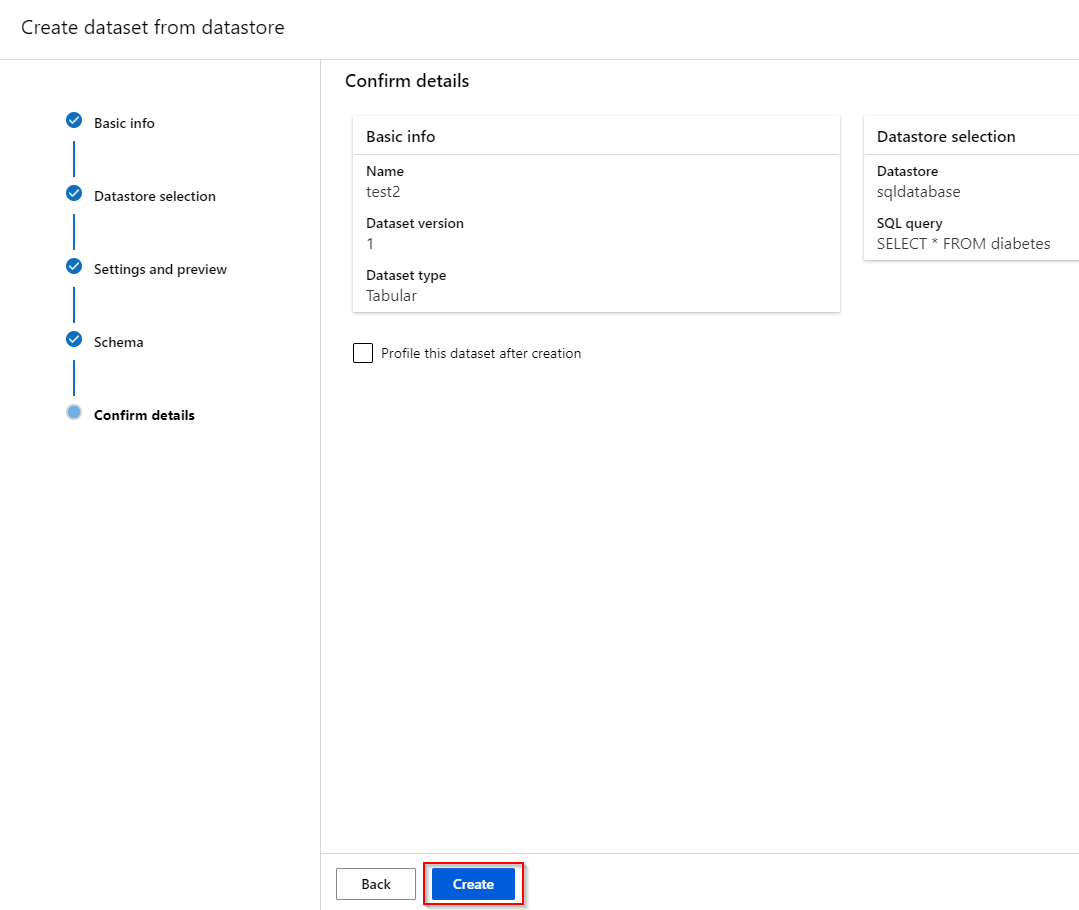
Step 5. “Settings and preview” and “Schema” tabs will not be available when you access a dataset using a SQL Dataset. Be sure to check the “Skip data validation“ when you continue.
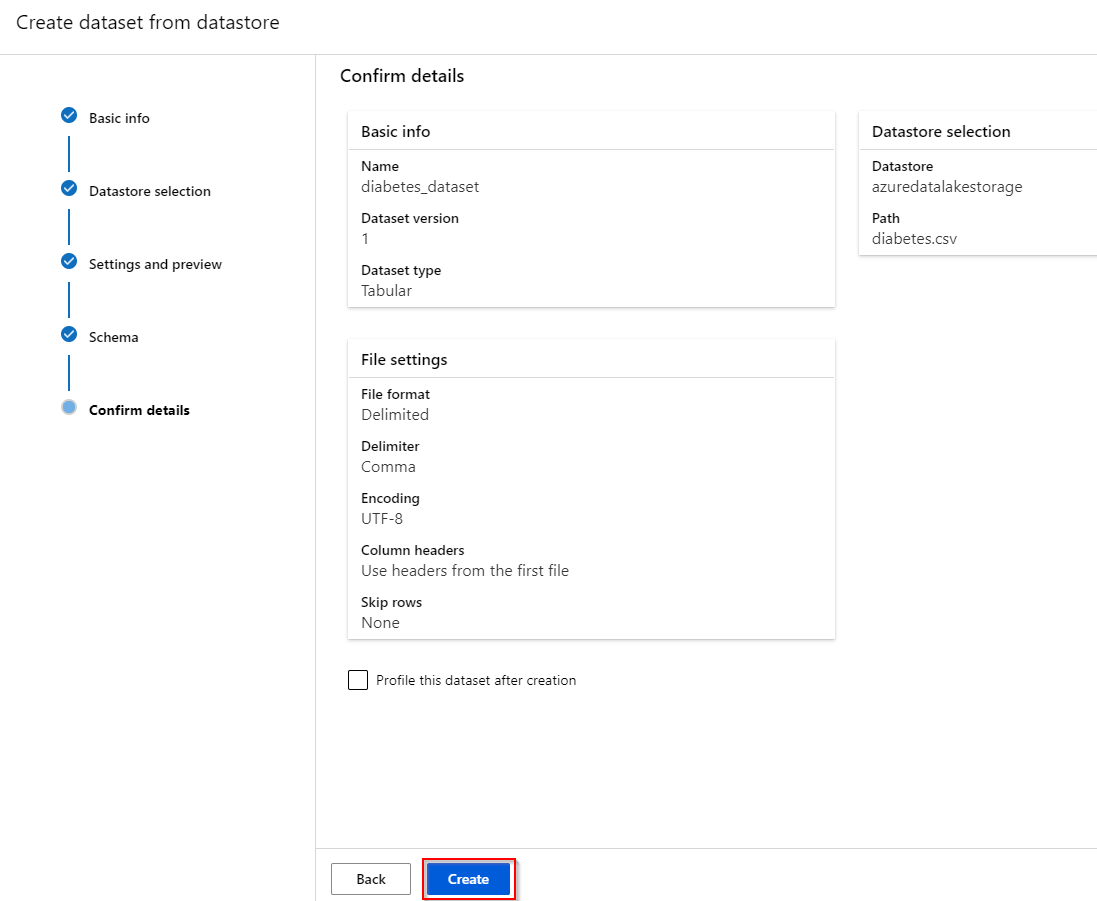
Step 6. After reviewing all the information, click on "Create".
2.4 Viewing the dataset#
After a dataset is registered, you can obtain information from this dataset in the workspace.
To view a registered dataset,
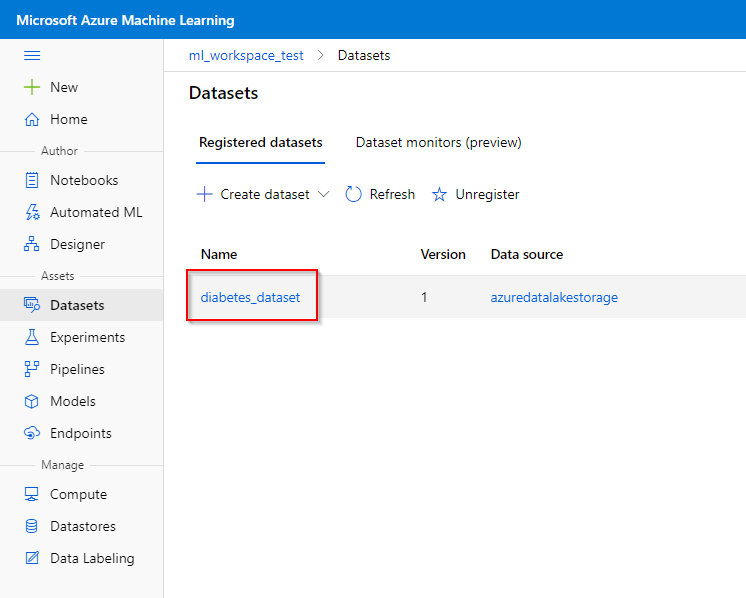
Step 1. Click on the dataset you want to view in the “Datasets” tab under the “Assets” category.
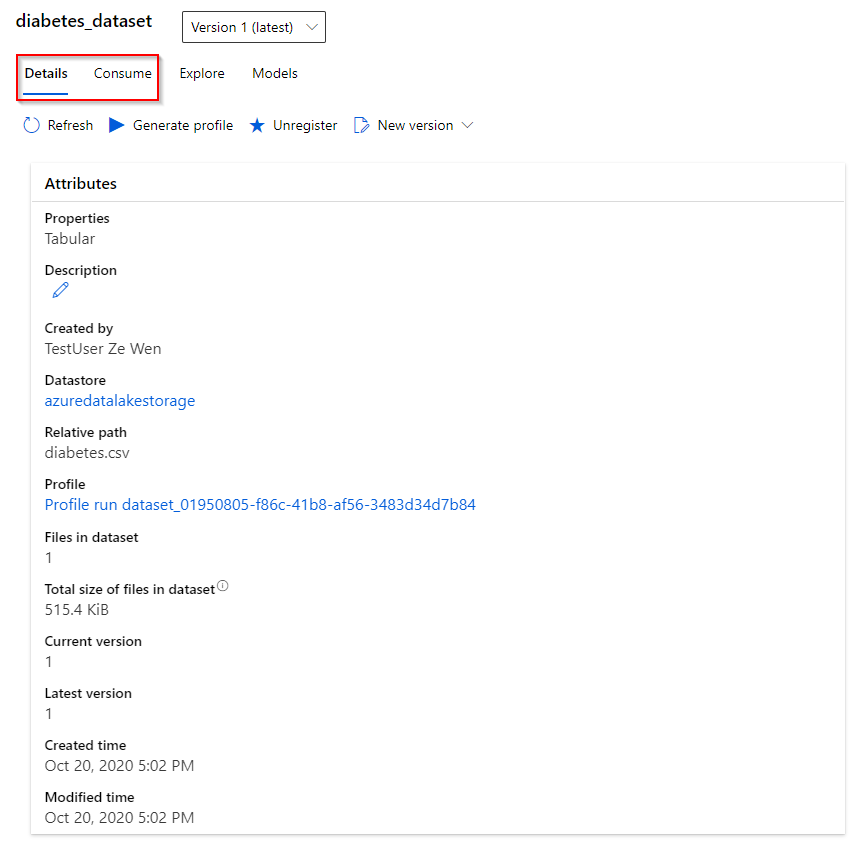
Step 2. In the dataset, you can obtain information about the dataset, such as the version, time of creation and time of modification in the “Details” tab. In the “Consume” tab, python code can be obtain to access the dataset programmatically (e.g. using the Notebook feature).
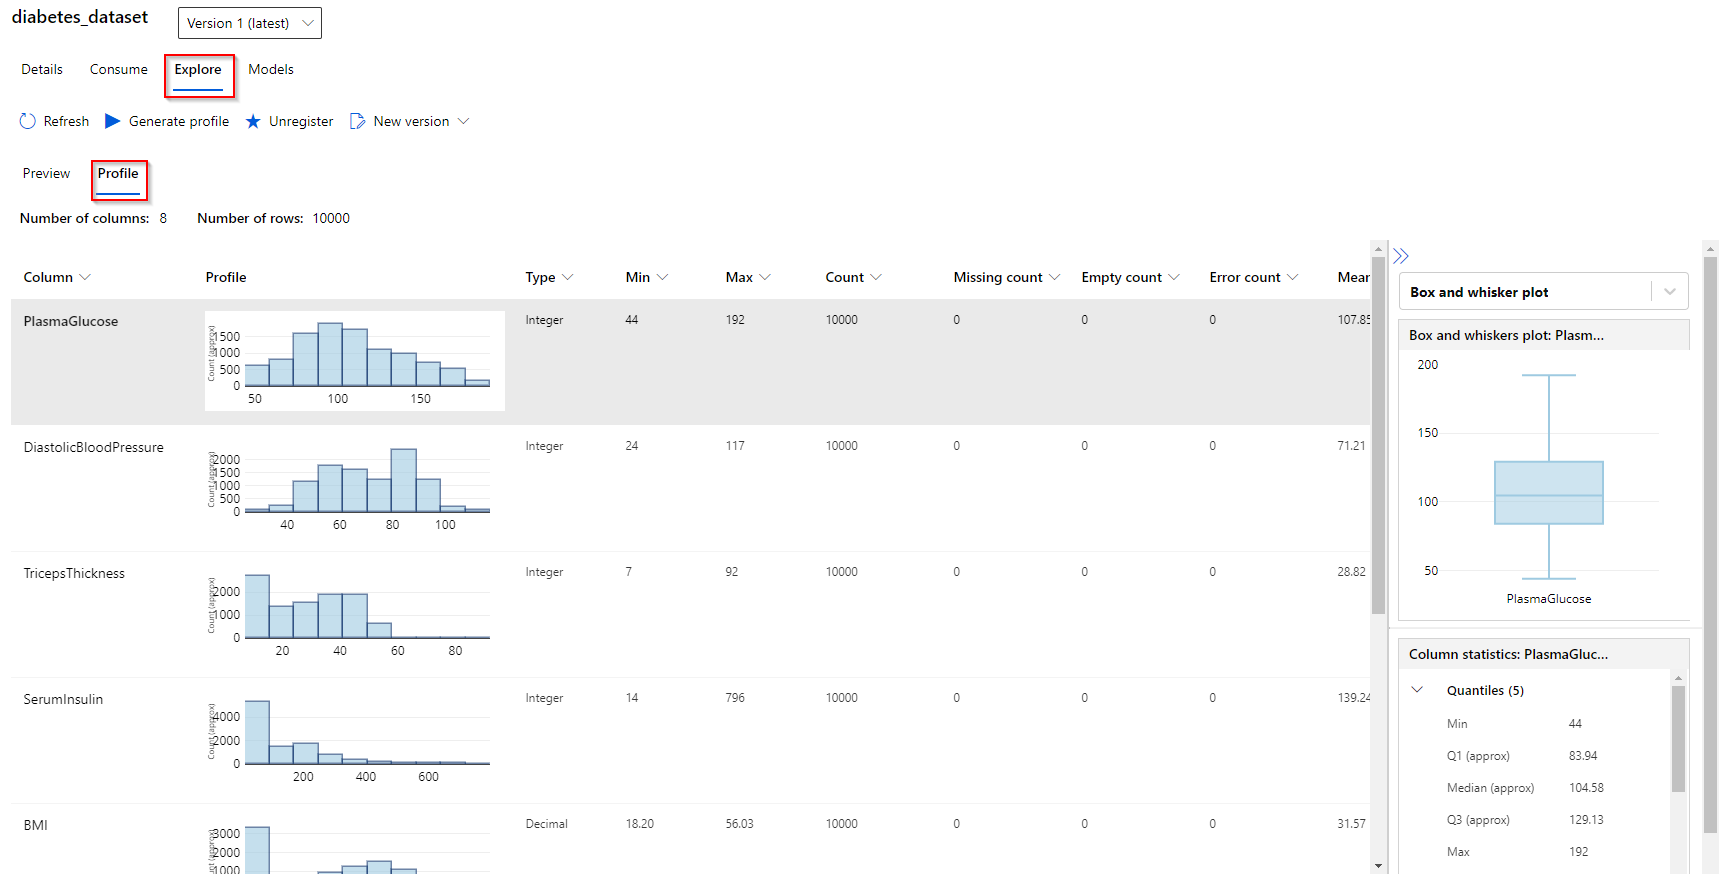
Step 3. In the “Explore” tab, you can preview the attributes of your dataset. In the “Profile” tab, you can observe simple characteristics of your attributes (histogram distribution, type, min-max value, mean, standard deviation)
Note: At the time of writing, previewing attributes is currently not supported for SQL datasets.
2.5 Unregister a dataset#
When you do not need the dataset anymore, you can unregister it. It deletes the reference to the dataset.
To unregister the dataset,
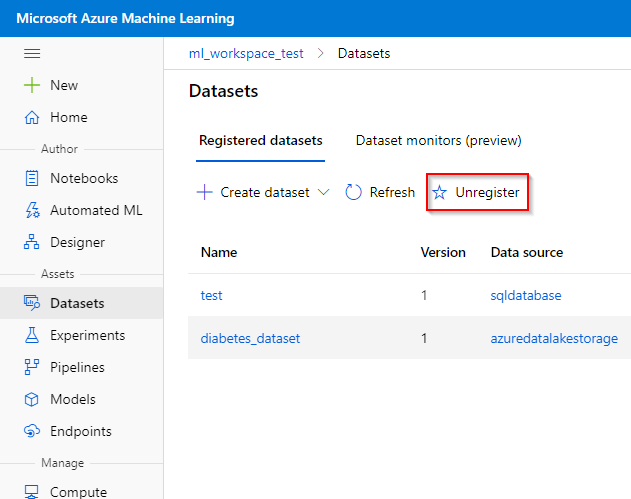
Step 1. Click on the dataset you want to unregister in the “Datasets” tab under the “Assets” category.
Step 2. Click on the unregister button.
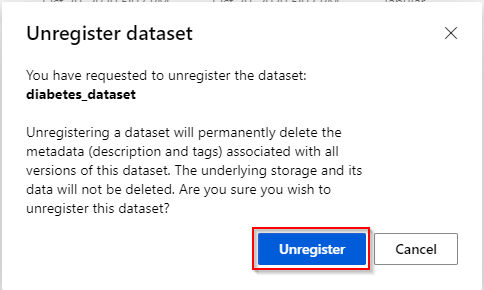
Step 3. Unregistering a dataset will delete the metadata of the dataset. Click on the “Unregister” button to finish.
3 Model training#
This section provides user instructions on when training a machine learning model by using a registered dataset. There are three ways to construct and train machine learning models in the workspace:
- Training a fast ML model set using the AutoML feature.
- Pre-process, train and post-process your data using the drag-and-drop Designer feature.
- you can train a custom machine learning model using Python/R script, using the Notebook feature.
The above features are sorted by setup effort, i.e., AutoML is best suited for someone without a strong background in data science and machine learning while the Notebook feature is providing the raw Python/R codes to be run on compute targets.
Finally, we provide instructions on how to explore the experimental runs when it has been trained using one of the above methods.
3.1 Create and submit a AutoML run#
Automated Machine Learning (AutoML) enables you to try multiple algorithms and preprocessing transformations with your data. This, combined with scalable cloud-based compute makes it possible to find the best performing model for your data without the time-consuming manual trial and error that would otherwise be required.
The AutoML feature can handle the following machine learning tasks:
-
Classification
-
Regression
-
Time-series forecasting
AutoML automatically pre-processes the provided data (scaling and normalization). For more info, see this link.
To create a AutoML experimental run,
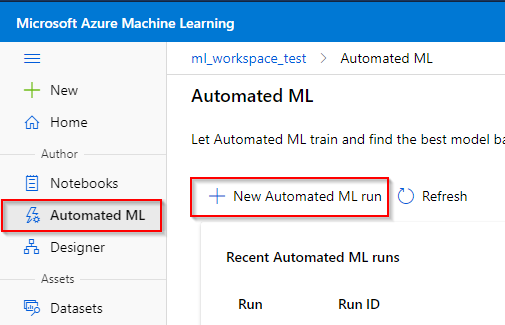
Step 1. Click the “Automated ML” tab under the “Author” category.
Step 2. Click on the “New Automated ML run” button
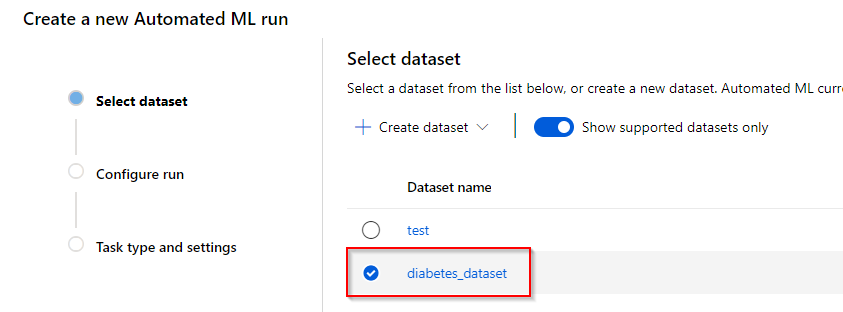
Step 3. The AutoML feature currently only supports TabularDataset. Here you can see all the registered datasets that can be used for this feature. Click on the registered dataset you want to use.
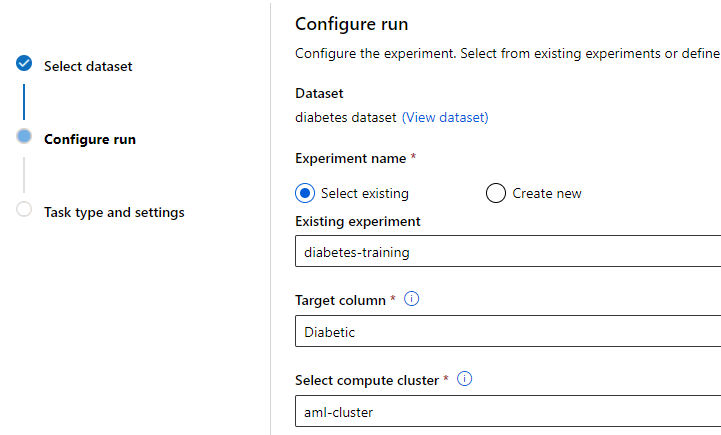
Step 4. In the “Configure run” tab, you can include the AutoML run in a registered experiment or create a new experiment. To continue, provide the target column (the column in the dataset that you want the model to predict) and the registered compute cluster in the workspace you want to utilize for the training.
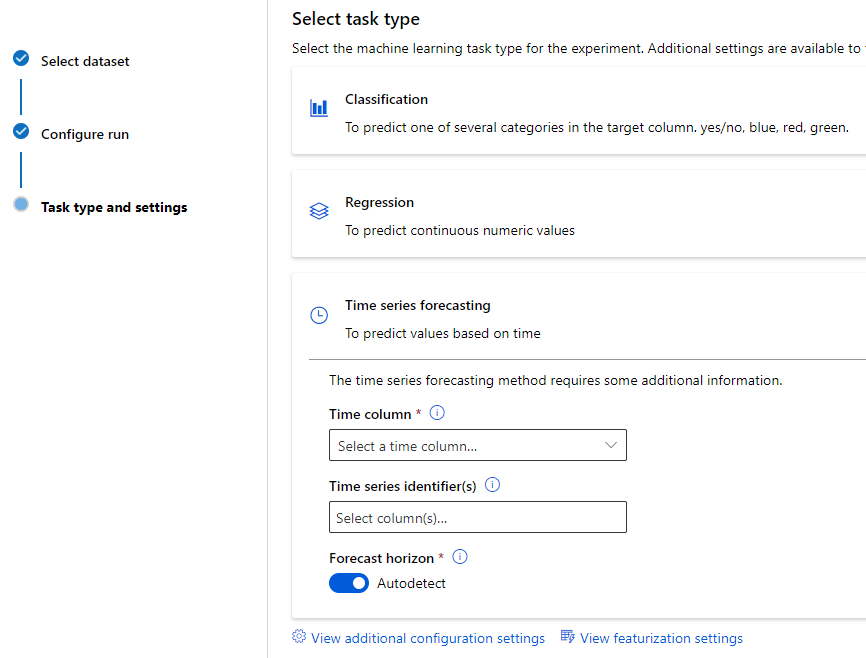
Step 5. In the final step, provide the task type (classification, regression or time-series forecasting). In the classification category, you can specify deep learning capabilities of AutoML. In the time-series forecasting category, additional information such as time column and forecast horizon need to be provided.
Additional configuration settings can be provided at the bottom, such as primary metric to train, validation type, exit criteria, etc. Finally, you can also specify to include feature engineering capabilities.
Step 6. Click the finish button at the bottom to send the AutoML run to the cloud.
More info on creating and submitting an AutoML run in the cloud can found here.
3.2 Create and submit a Designer pipeline run#
In Azure Machine learning, you run workloads as experiments that leverage data assets and compute resources. In an enterprise data science process, you'll generally want to separate the overall process into individual tasks, and orchestrate these tasks as pipelines of connected steps. Azure Machine Learning designer lets you visually connect datasets and modules on an interactive canvas to create machine learning models.
To create a new Designer pipeline,
Step 1. Click the “Designer” tab under the “Author” category.
Step 2. Click on the “+” button to create a pipeline from scratch or click on one of the predefined pipeline templates that is similar to your ML problem.

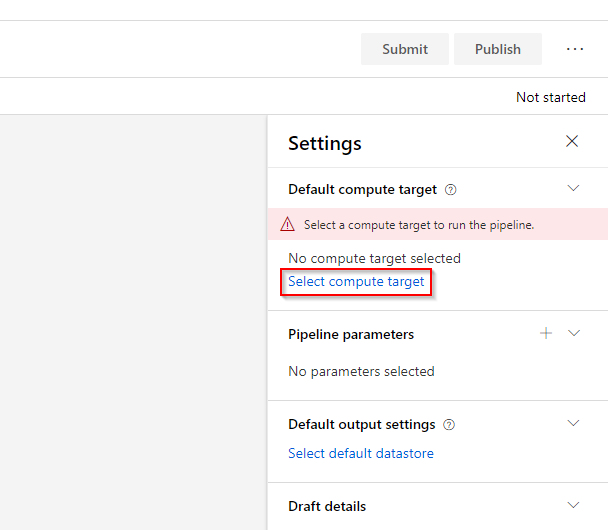
Step 3. When you create a new pipeline, you will be reminded to select a compute target to use when submitting the pipeline. Select the compute cluster that is provided to you as the compute target.
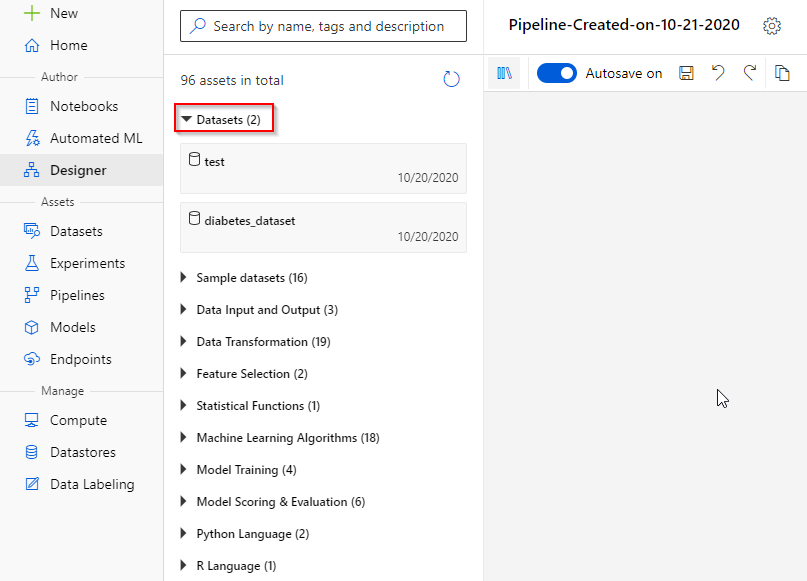
Step 4. At the left, you will see the different assets/building blocks you can use to pre-process, train and post-process your dataset. In the “Datasets” asset, you will see all the registered datasets in the workspace.
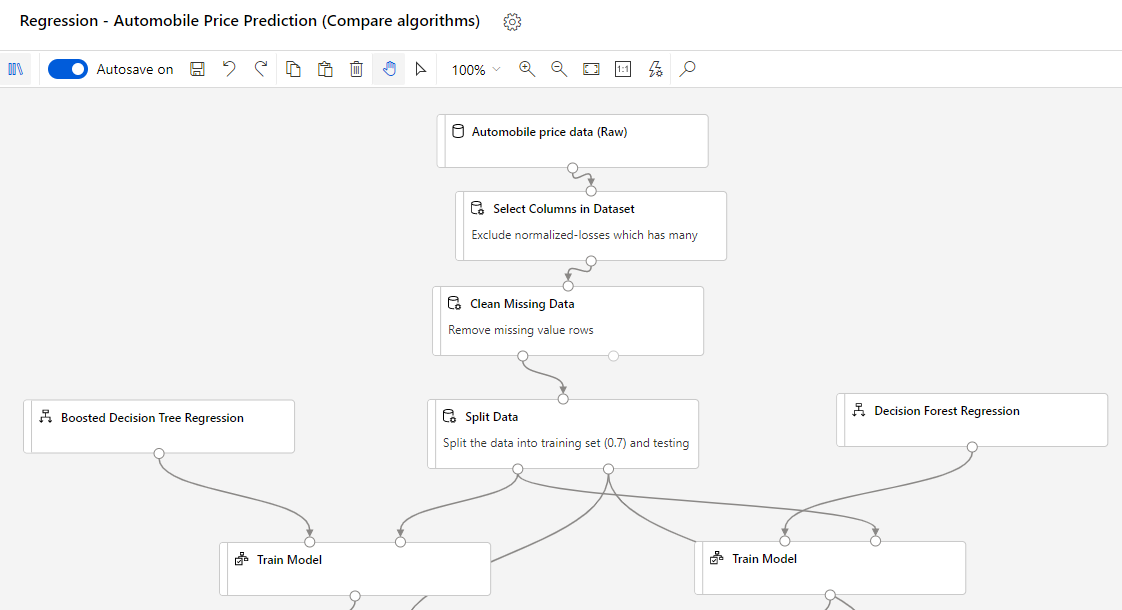
Step 5. For creating a sophisticated pipeline, Microsoft recommends to use the Algorithm cheat sheet or this page when selecting machine learning algorithms. At the bottom, you can see the Automobile Price Prediction template, which compares the results of two different, trained machine learning models on the Automobile price data.
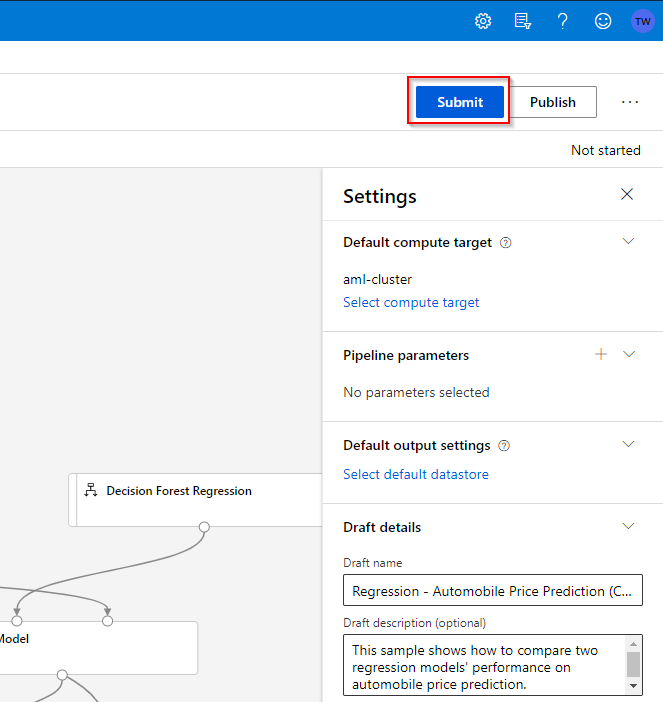
Step 6. When you are finished with a pipeline, you can submit it to run in the cloud. To do this, click on the “Submit” button on the upper-right.
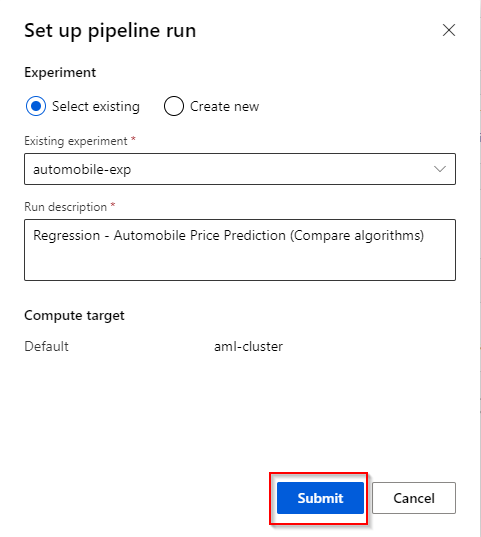
Step 7. You can register the pipeline run in one of the existing experiments or create a new experiment. A short description for the pipeline run can also be provided. Click the “Submit” button to finalize.
Note: When working in the Designer, your progress will be saved automatically (can also be disabled).
To find your pipeline draft,
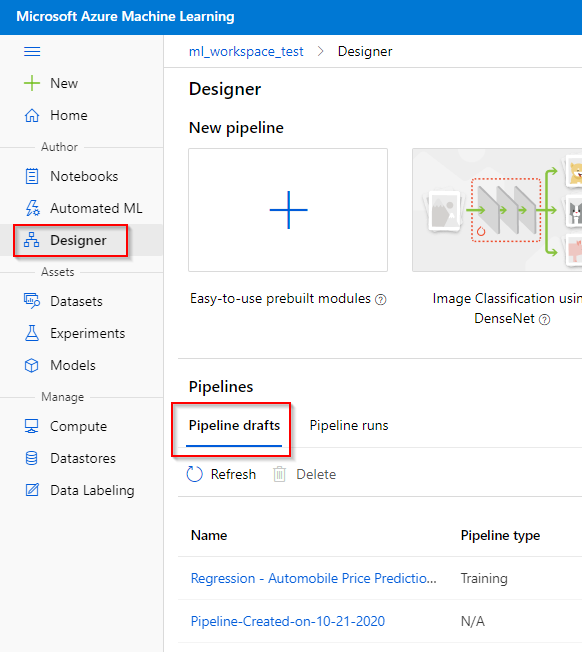
Step 1. Click on the “Designer” tab in the “Author” category.
Step 2. Click on the “Pipeline drafts” button to find all the saved pipeline drafts available.
More info on creating and submitting a Designer pipeline in the cloud can found here.
3.3 Create and submit a custom machine learning model using the Notebook#
With the Azure ML Studio, you can also write and run your own code in managed Jupyter Notebook servers that are directly integrated in the workspace.
Microsoft has provided several Machine Learning tutorials on how to connect to the workspace resources and create and run experiments in a programmatic way.
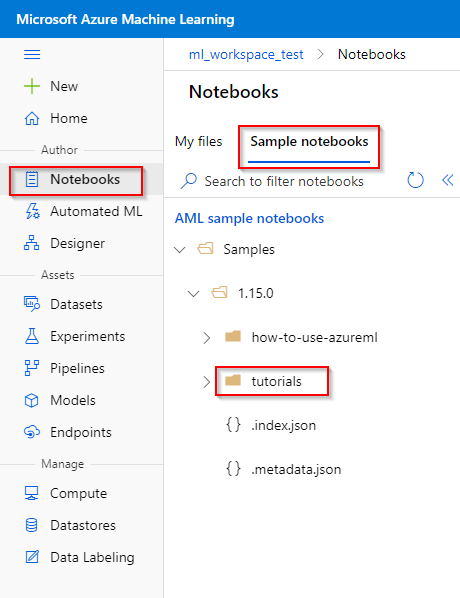
To find the tutorials,
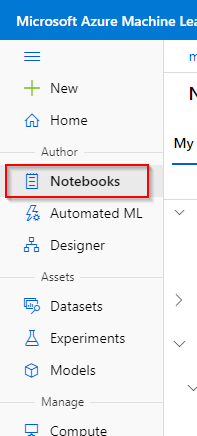
Step 1. Click on the “Notebook” tab under the “Author” category.
Step 2. Click on the “Sample notebooks” button.
Step 3. Click on the latest version of the tutorials.
Furthermore, we also provide a Azure ML Studio Notebook cheat sheet that contains code snippets, extracted from Microsoft tutorials. Please contact the technical team for this cheat sheet.
3.4 Exploring the Experimental runs#
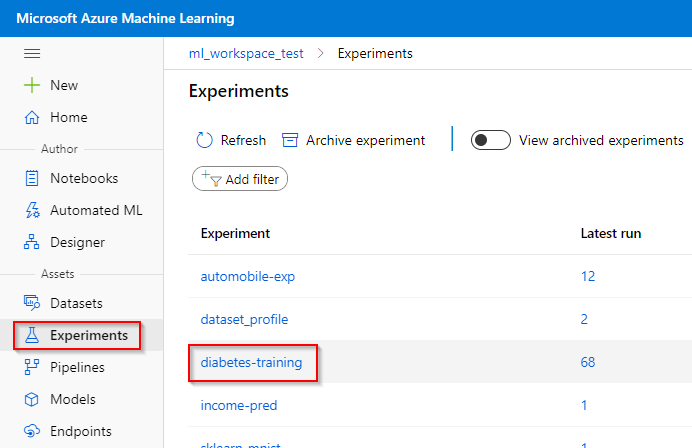
The information on an Azure ML experimental run can be viewed in the “Experiment” tab under the “Assets” category.
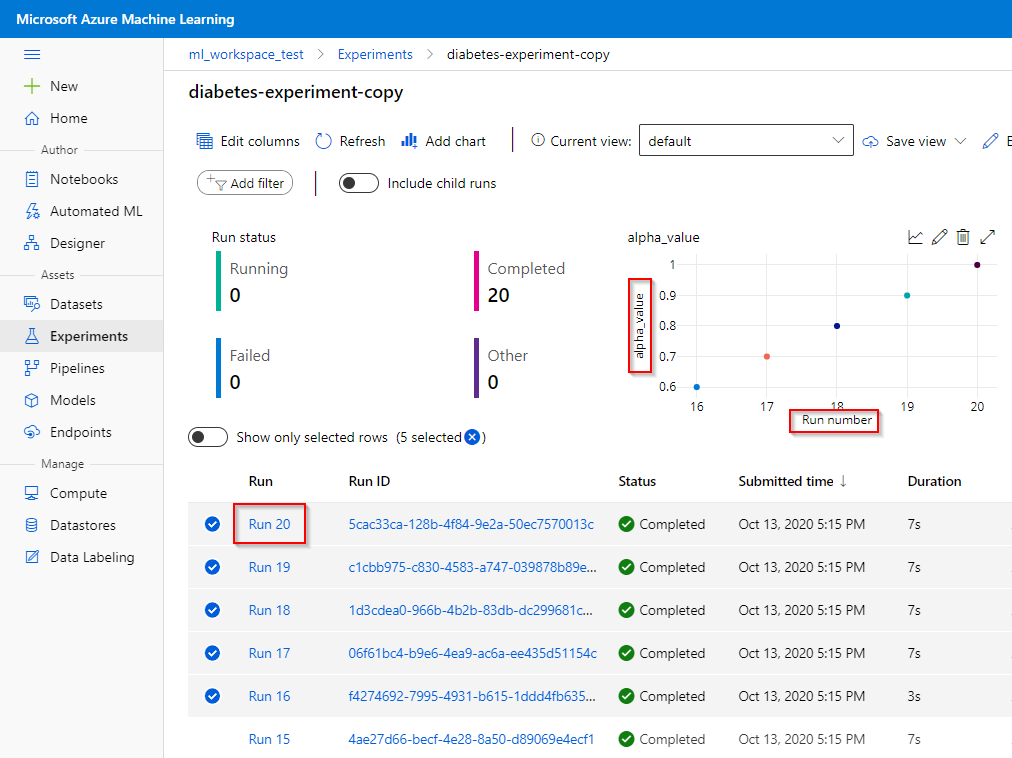
In the Azure ML experiments, you can see which runs are still running, failed or completed. If you assigned any custom, logged metrics to your runs (using the Notebook feature), the evolution of these metrics over different runs can be viewed here. In the example below, the “alpha_value” logged metric is plotted against the selected experimental runs.
To go into the details of an experimental run, click on an experimental run.
In a run, information regarding e.g., the time of creation, the duration time, etc. can be viewed in the “Details” tab.
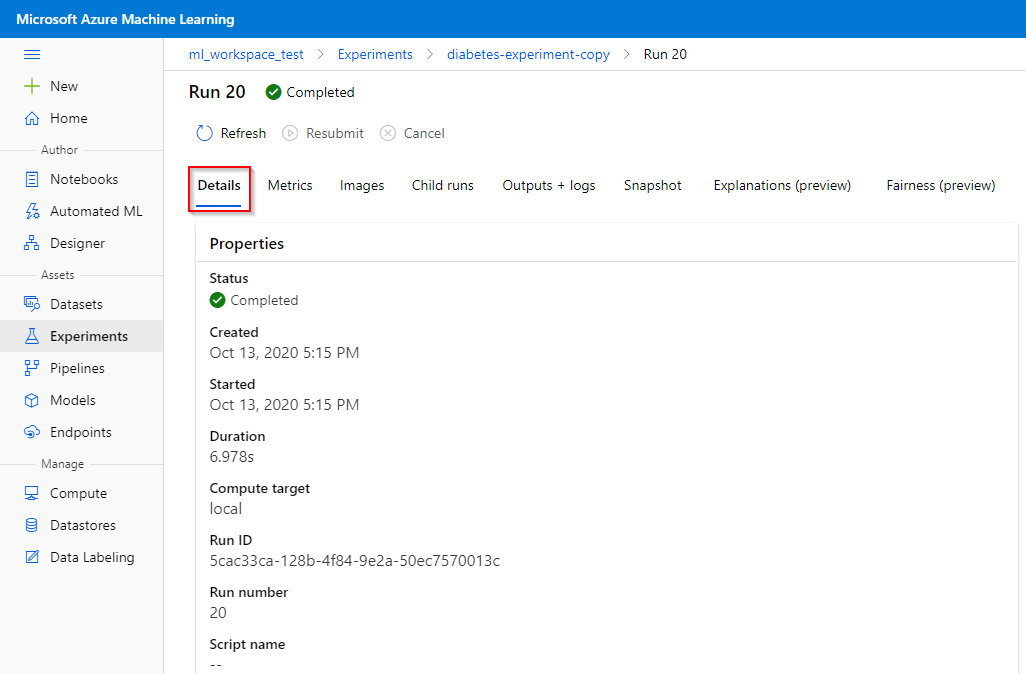
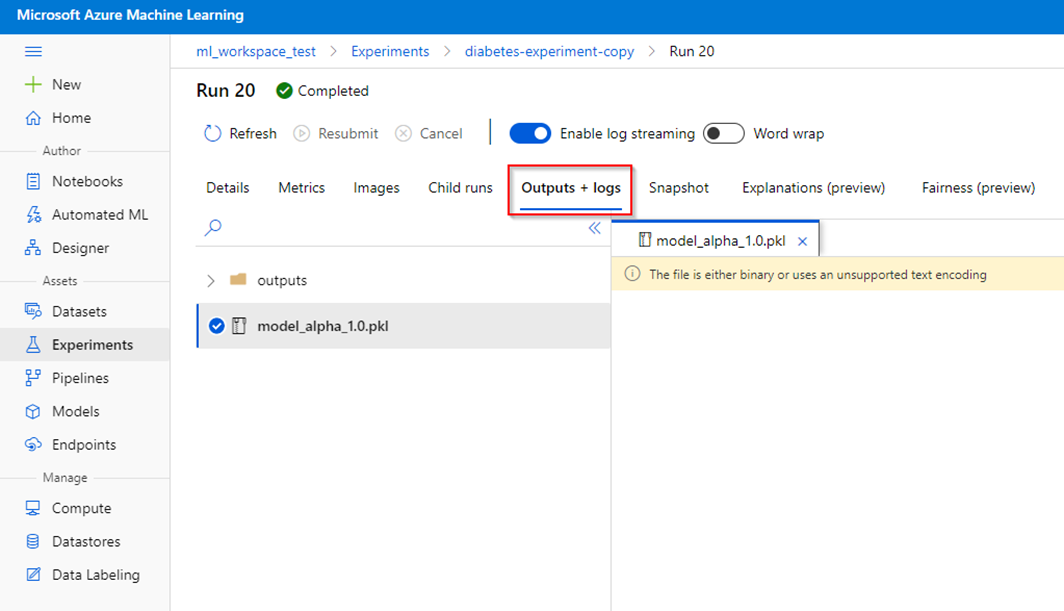
In the “Outputs + logs” tab, you can download outputs and logs associated with the run. This may include the model in pkl-format, which can be downloaded for further analysis and prediction.
4 Model registration#
After training the model, you can register it in the workspace from the trained machine learning model runs. Registering a model might be beneficial to manage the machine learning environment of your organization, e.g., be able to reference the model in the Notebook feature.
We provide instruction on
- Registering a model from registered experimental runs
- Registering a model from a local model file
4.1 Registering a model from registered experimental runs#
This section shows how to register a trained machine learning model from an experimental run. To do this,
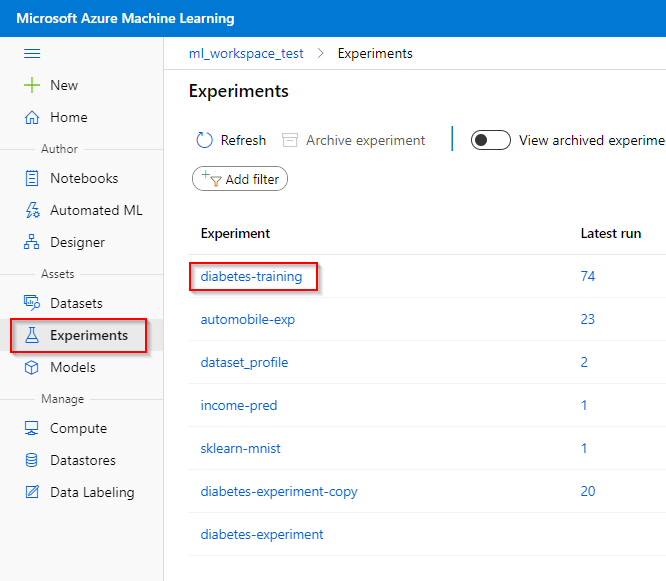
Step 1. Click on the “Experiments” tab under the “Assets” category.
Step 2. Click on the experiment where your model is trained.
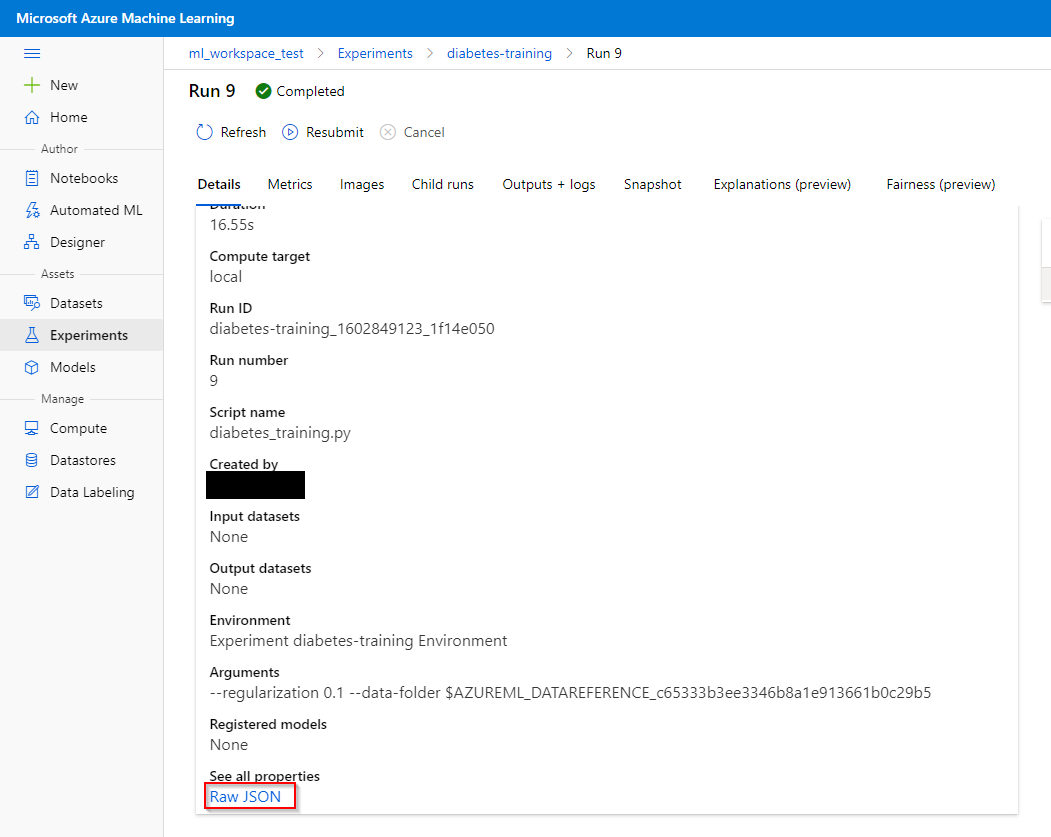
Step 3. Click on the run where your model is trained. The information on the framework property of your trained model can be found in the Raw JSON file. This information is necessary to register your model.

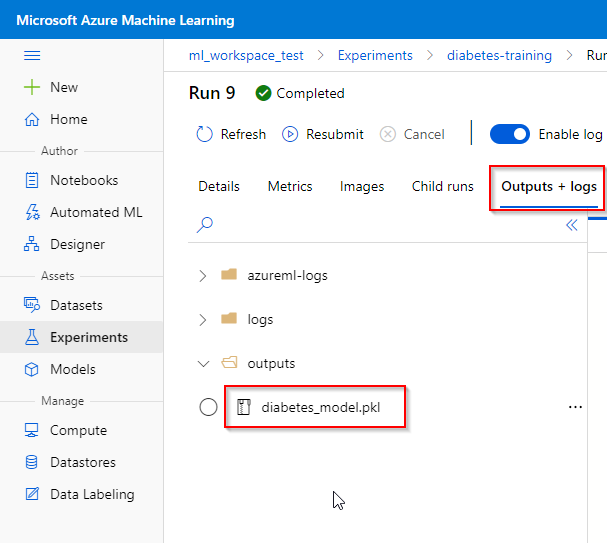
Step 4. Click on “outputs + logs” and download the model file.
Step 5. Now you have the trained model file locally. To continue with registering your model, go to the next section.
Note. the process to register a trained model can be automated using the Notebook feature.
4.2 Registering a model from a local model file#
After training the model, you can register it in the workspace from the trained machine learning model runs. Registering a model might be beneficial to manage the machine learning environment of your organization, e.g., be able to reference the model in the Notebook feature.
This section shows how to register a trained machine learning model from a local model file. To do this,
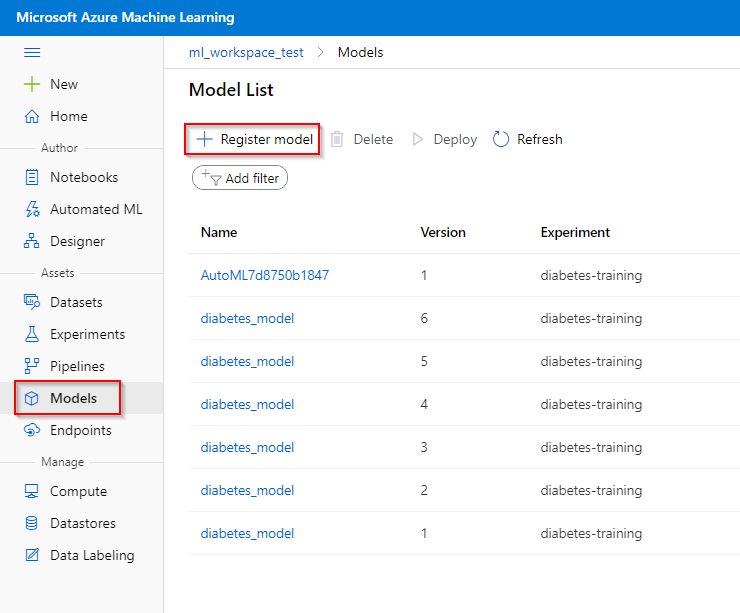
Step 1. Click on the “Models” tab under the “Assets” category,
Step 2. Click on the “Register model“ button,
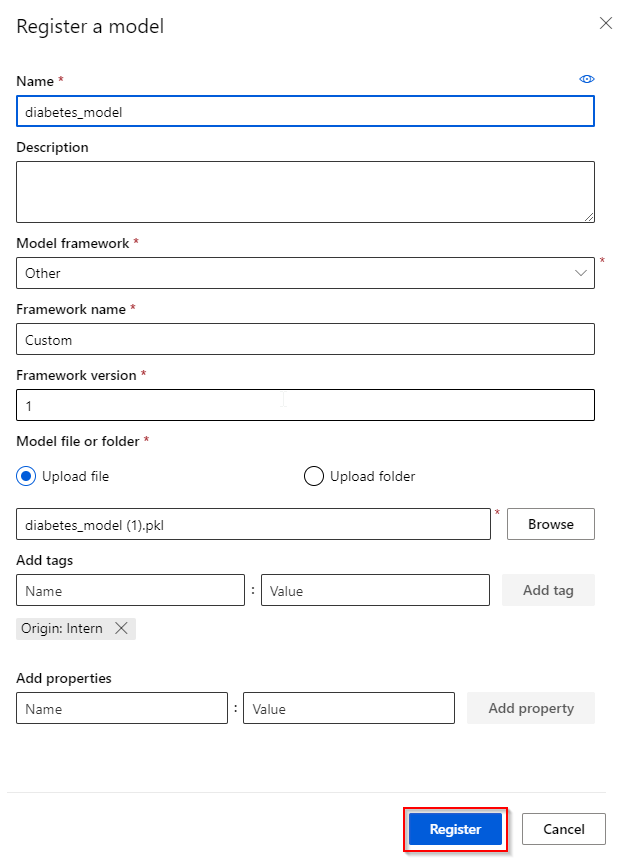
Step 3. Give a name to your model and specify the model framework (see previous section). Also, provide the framework version (for keeping track of your models) and model file corresponding to the model framework given (e.g. the pkl-file). You can also provide tags and properties that are associated with your model.
Step 4. Finish the registration by clicking the “Register” button.
Congratulations! You have successfully registered a trained machine learning model in the Azure ML Studio workspace.
Note. the process to register a trained model can be automated using the Notebook feature.
5 Data Labeling (special use case)#
Labeling voluminous data in machine learning projects is often a headache. Projects that have a computer-vision component, such as image classification or object detection, generally require labels for thousands of images.
Azure Machine Learning data labeling gives you a central place to create, manage, and monitor labeling projects. Use it to coordinate data, labels, and team members to efficiently manage labeling tasks. Machine Learning supports image classification, either multi-label or multi-class, and object identification with bounded boxes.
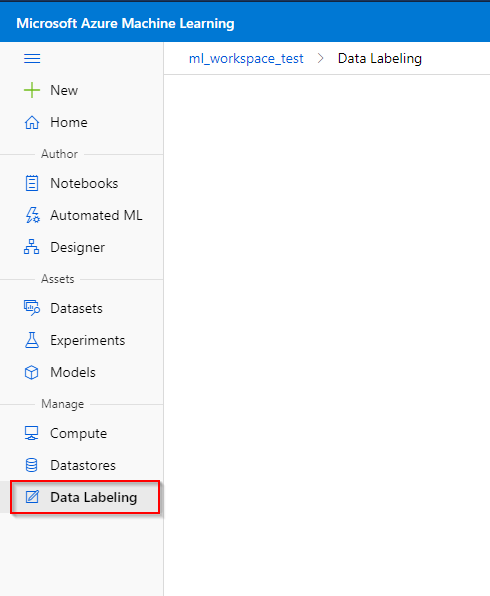
To create a labelling project, click on the “Data Labelling” tab under the “Manage” category.
To use this special feature of data labelling, please look into the following links:
- https://docs.microsoft.com/en-us/azure/machine-learning/how-to-create-labeling-projects
- https://docs.microsoft.com/en-us/azure/machine-learning/tutorial-labeling
6 Git Integration#
Git is a popular version control system that allows you to share and collaborate on your projects. Azure Machine Learning fully supports Git repositories for tracking work - you can clone repositories directly onto your shared workspace file system using Git on your local workstation.
To clone a repository,
Step 1. Click on “Notebooks” tab under the “Author” category.
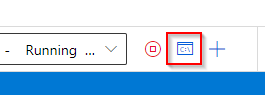
Step 2. Open any notebook and click on the “Open terminal” button, located at the upper-right.
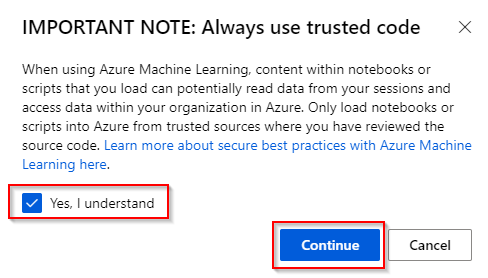
Step 3. You should only load notebooks or scripts from trusted sources. If you understand the warning, click on “Continue”.
Step 4. A new terminal will open and you can enter git commands to clone a repository.
7 Model Deployment#
Azure ML Studio has also the feature to deploy a trained machine learning model using a real-time Azure Container Instances (ACIs), a Web Service. This might be useful to utilize for the example use case:
-
Production environment such as a doctor's surgery where only patients deemed to be at risk need to be subjected to a clinical test for diabetes. In this example scenario, you can deploy the model as a real-time web service.
-
When trained a Fake ID checker machine learning model, you can deploy the model as a real-time web service.
Note. An active real-time ACI incur costs while being active. Please delete the public endpoint if you are not using it anymore.
We will provide instructions on
-
Deploying a Web Service
-
View a Web Service
-
Deleting a Web Service
More info on model deployment can be found in its Microsoft documentation.
7.1 Deploying a Web Service#
The best practice is to deploy a Web Service using the Python SDK in the Notebook. Please consult the provided cheat-sheet for this option. However, deployment is also possible using the Azure ML Studio graphical user interface.
A model can only be deployed after you have registered it in the Azure ML Studio. To deploy a model,
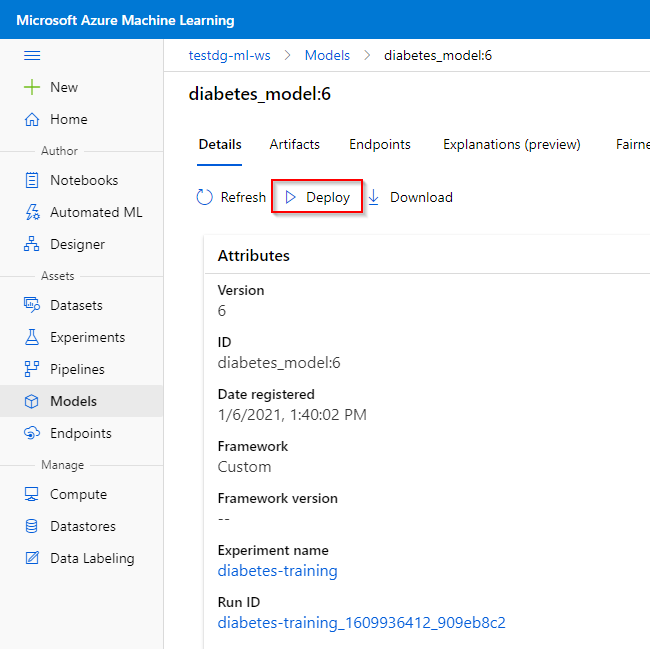
Step 1. Click on “Models” tab under the “Assets” category.
Step 2. Click on the model you want to deploy.

Step 3. Click on "Deploy".
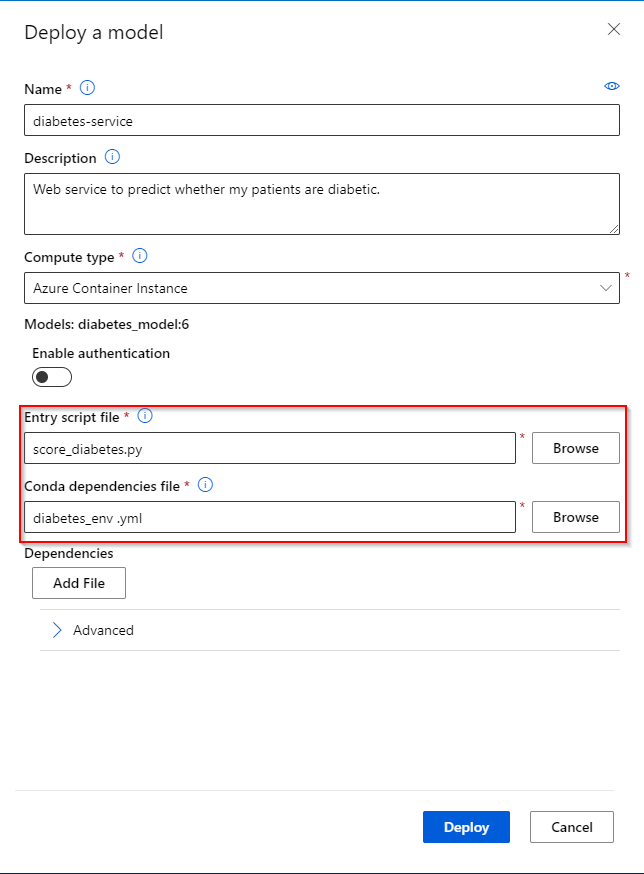
Step 4. Provide a name for your Web Service. You can also provide a description and enable authentication on the Web Service. ACI only supports key-based authentication. More info here.
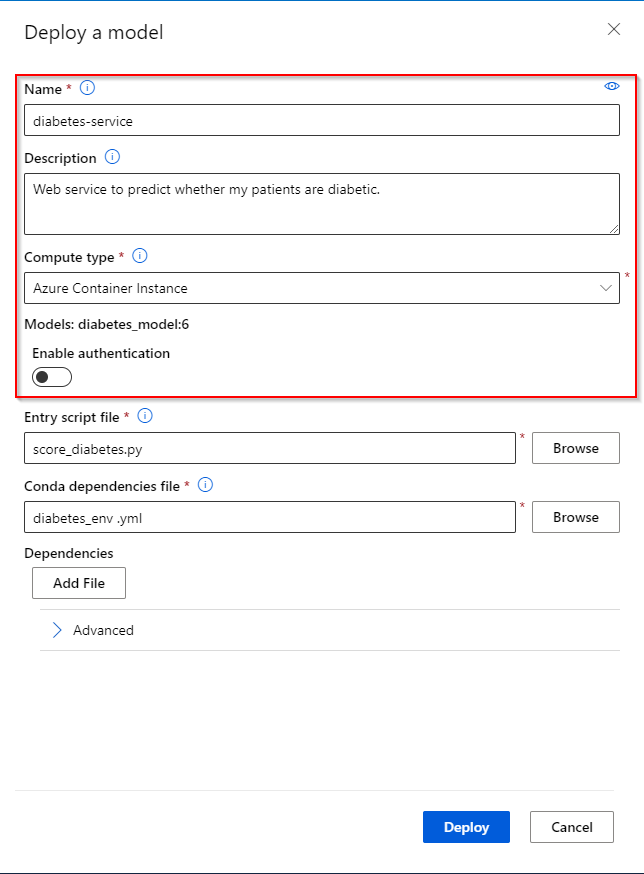
Step 5. Provide the entry script and a conda dependencies file. The entry script is used to process the data send to the Web Service. It can be a python file containing an init() and a run(data) function. The conda dependencies files defines the environment used to run the deployed model. More info here.
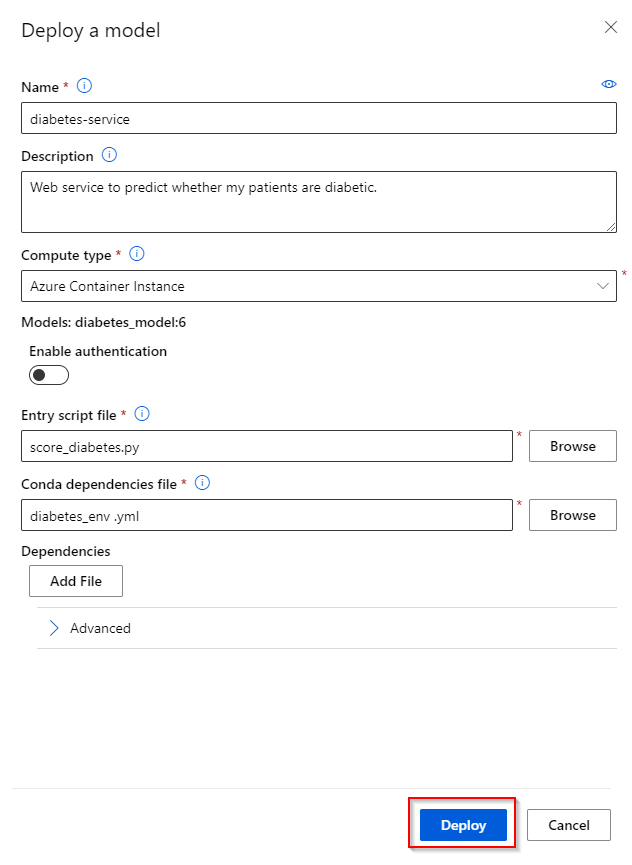
Step 6. Click on "Deploy" to submit the Web Service.
Step 7. If the Web Service is in the "Healthy" deployment state, then it is ready to use.
7.2 View a Web Service#
To view a deployed Web Service,
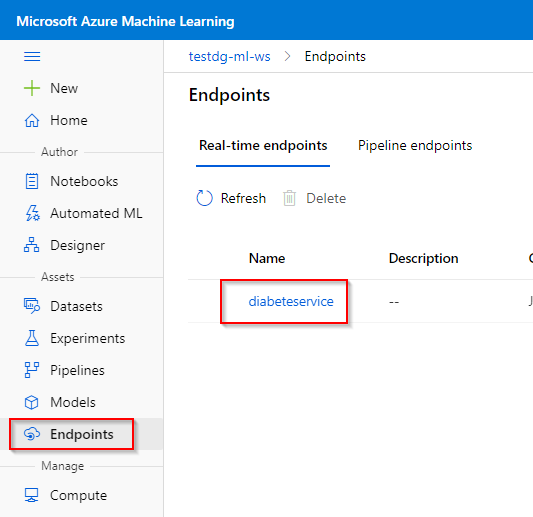
Step 1. Click on “Endpoints” tab under the “Assets” category.
Step 2. Click on the Web Service you want to view.
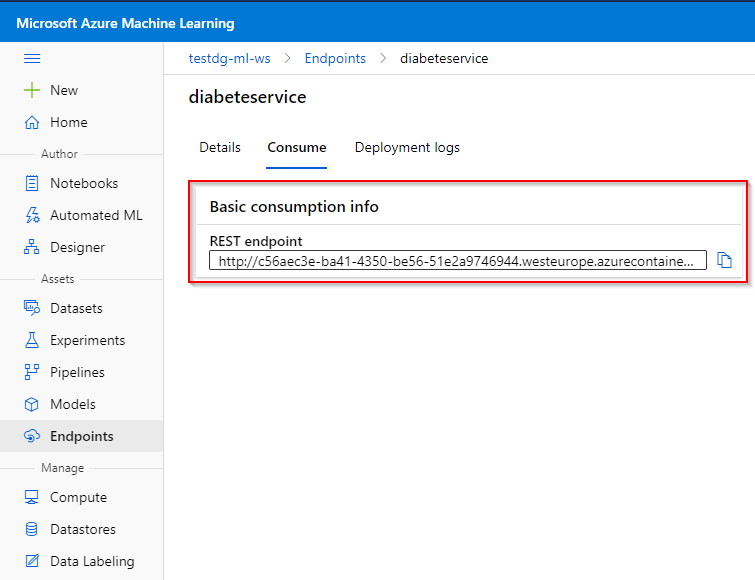
Step 3. Here, you can view the deployment state, the creation date, etc. Click on "Consume".
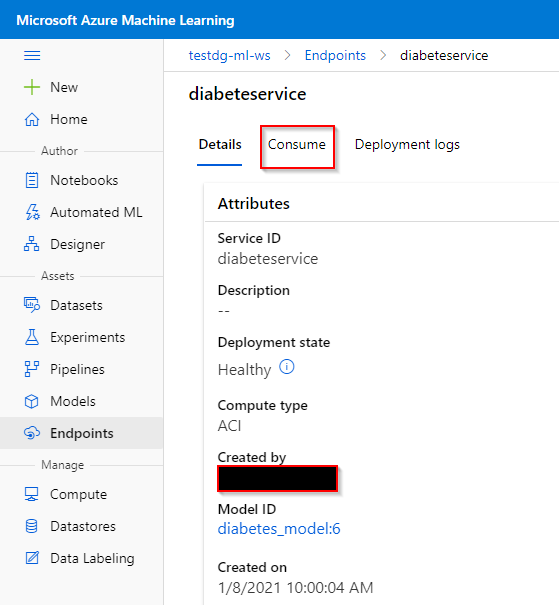
Step 4. Here you can view the REST endpoint to call the Web Service.
7.3 Deleting a Web Service#
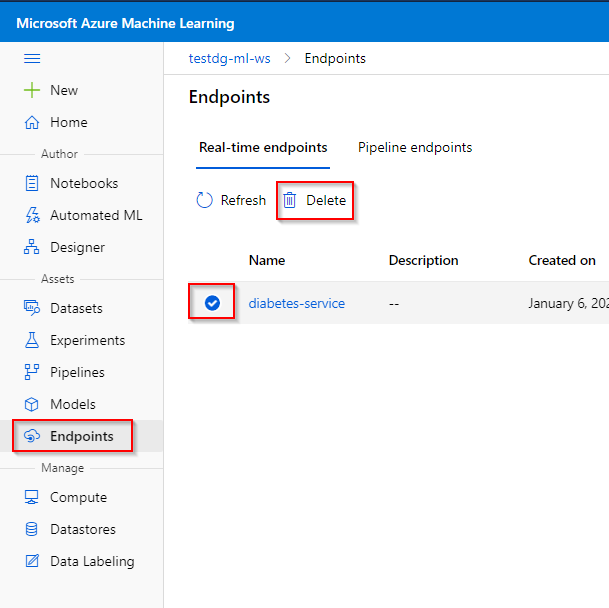
Step 1. Click on “Endpoints” tab under the “Assets” category.
Step 2. Click on the Web Service you want to delete.
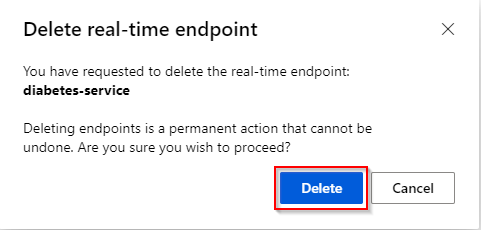
Step 3. Click on "Delete".
Step 4. Deleting enpoints is a permanent action. Click on "Delete" again.
8 Sources#
- https://docs.microsoft.com/en-us/learn/paths/build-ai-solutions-with-azure-ml-service/
- https://docs.microsoft.com/en-us/azure/machine-learning/