Cloud Agnostic Portal
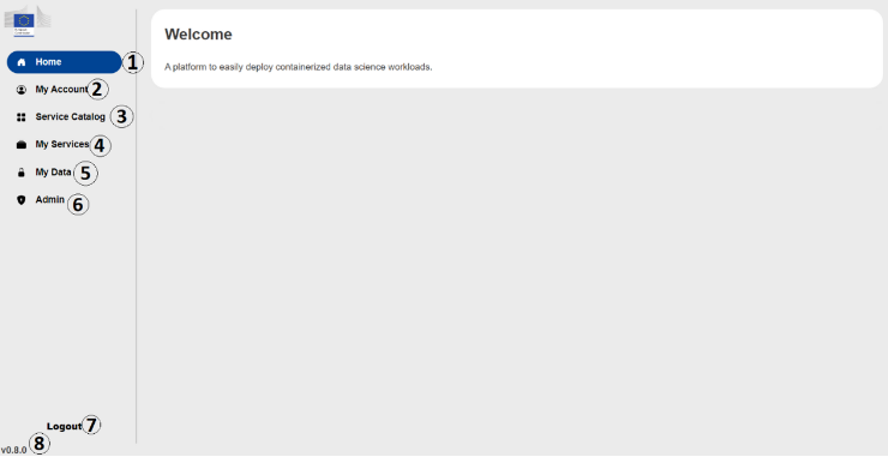
The Cloud Agnostic Portal is comprised of two elements: the sidebar and the pages themselves. The sidebar allows the users to navigate to different pages in the portal by clicking their respective buttons, and each page will have its content in panels. The following pages are available in the portal:
- Home, which redirects to the portal home page.
- My Account, which displays user info and DSL info.
- Service Catalog, which displays all offered services.
- My Services, which displays all deployed services.
- My Data, which displays available storage and secrets.
- Admin, visible by DSL Admins only.
These services and their capabilities are presented in more details below.
Portal access#
As mentioned in the introduction, the Cloud-Agnostic Portal is accessible from any web browser. The portal URL is customized with the portal ID and provided with the following format:
https://portal.*portal_id*.ecdp.dataplatform.tech.ec.europa.eu
The “Portal ID” would be in a format like “P1”. This number references the portal deployed for certain end user. When accessing the Self-Service Portal you should be prompted to the following login page:
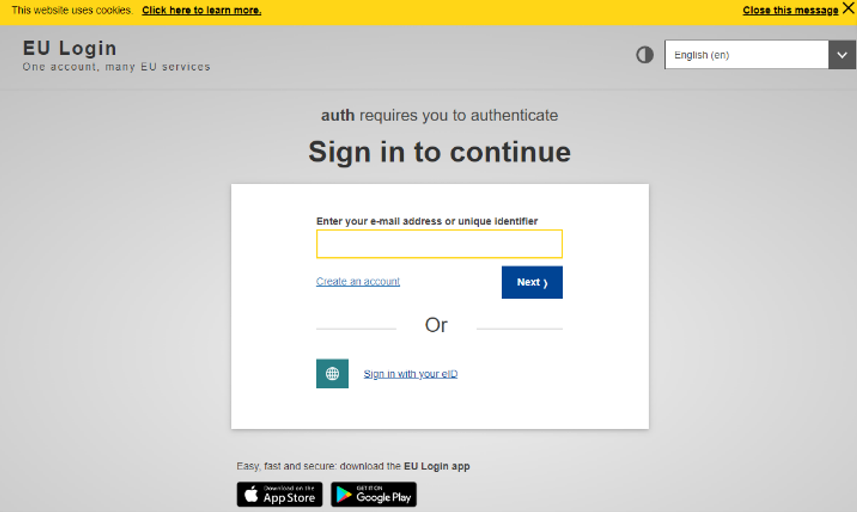
To login, input your EU Login credentials and access through your preferred MFA Method.
Portal walkthrough#
When accessing the portal, the following page is shown to the user. Each of the portal’s component will be presented in this section of the document.
1) Home#
By clicking on this component, the user is redirected to the home page, which contains a welcome message and a brief description of the platform’s scope: A platform to easily deploy containerized data science workloads.
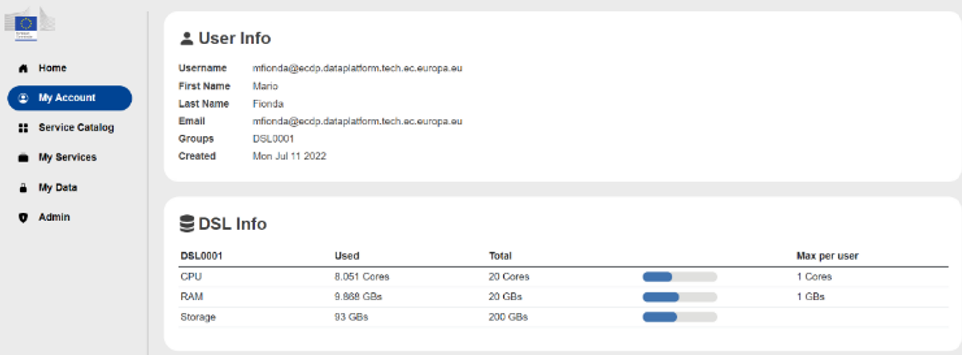
2) My Account#
By clicking on this component, the user is redirected to their account details page. The following information are presented:
- User Info: Username, First Name, Last Name, Email, Groups, User’s creation date
- DSL Info: CPU (Used – Total – Max per user), RAM (Used – Total – Max per user), Storage (Used - Total - Max per user)
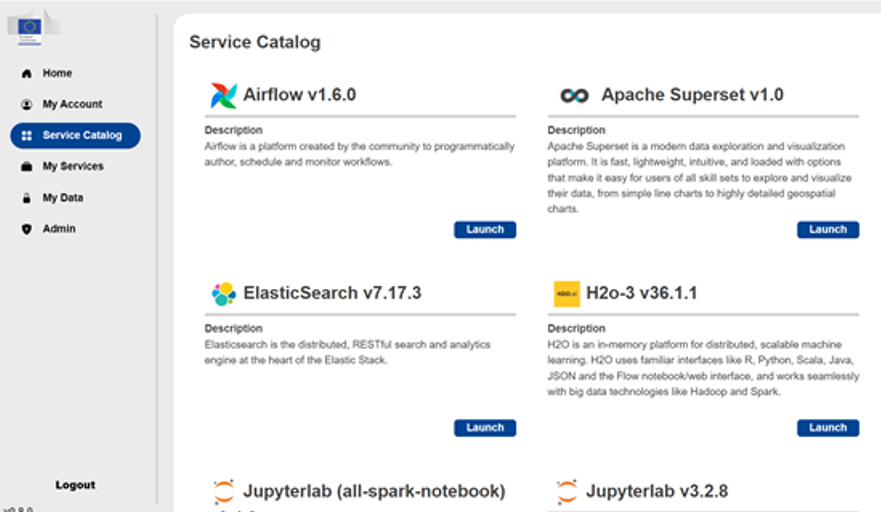
3) Service Catalog#
By clicking on this component, the user has access to the list of available services. Directly from this page, the user can easily configure and launch any of the presented services.
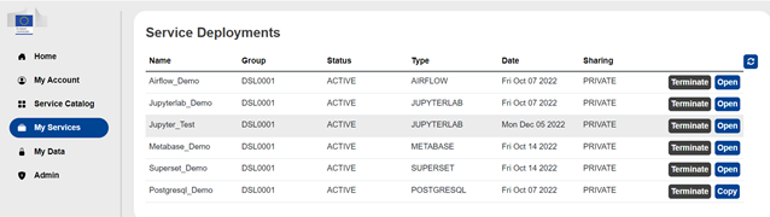
4) My Services#
By clicking on this component, the user has access to the list of resources deployed (both the one deployed by the user and the resources that has been shared with all the DSL users)
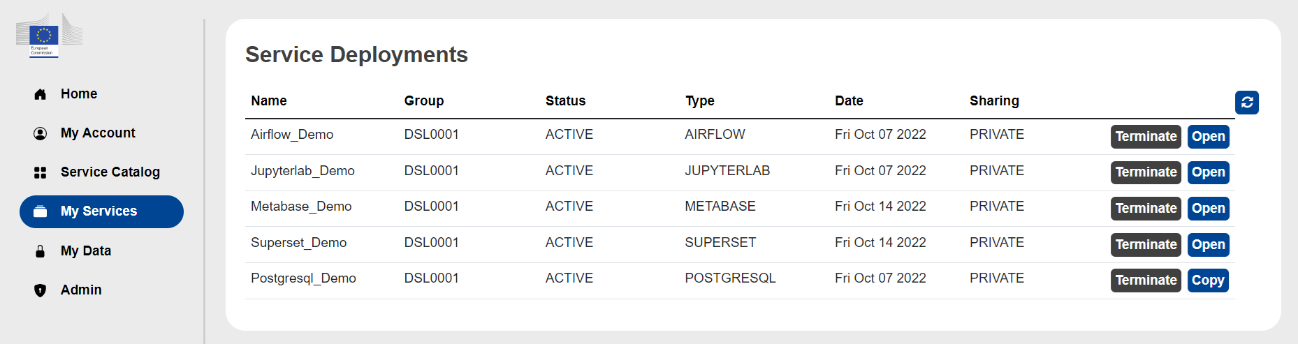
Each service is characterized by the followings:
- Name/alias of the deployment – defined during deployment configuration
- Group – DSL associated to the instance
- Status – Status of the instance: can be Active or Pending
- Type – Service of the deployment
- Date – Deployment date
- Sharing – Indicating whether the deployment is private (only the user can see and access it) or shared (all DSL members can see and access it)
The user can also click on a deployment to display a popup with more detailed information about the specific deployment.
Please note that there are two types of deployments, those with external and internal types of interfaces. Deployments with external interfaces are accessible from a web browser and therefore have an Open button, which once pressed will redirect the user to the deployment. Deployments with internal types of interfaces will be inside the private network and will therefore only be accessible from inside another deployment, they therefore have a Copy button which copies the deployments’ private IP to the clipboard.
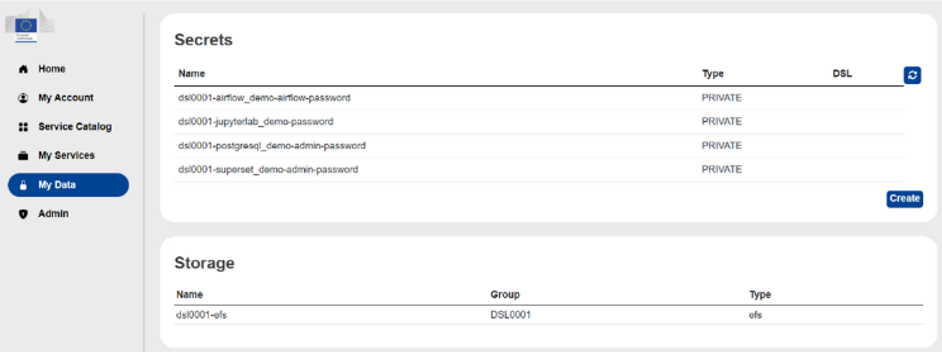
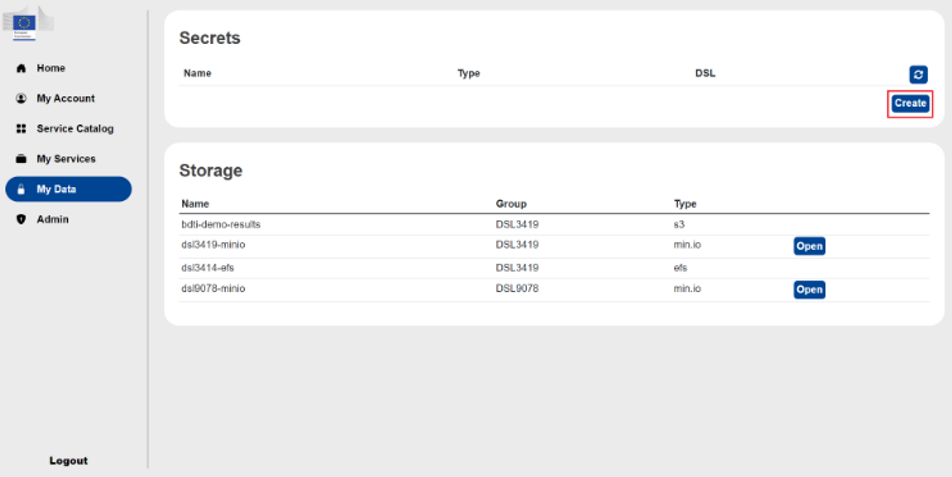
5) My Data#
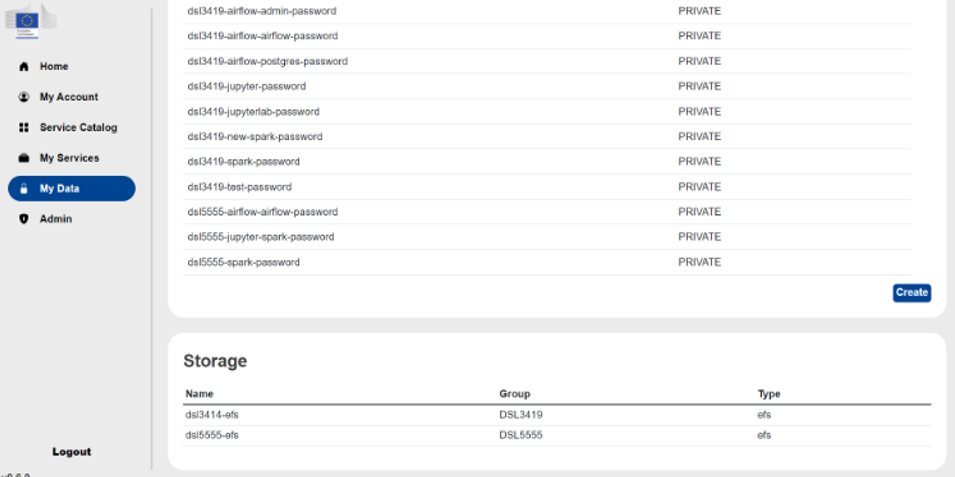
By clicking on this component, the user has access to the list of secrets (both the ones registered by the user and the ones that has been shared with all DSL users) and some information related to the storage volumes associated to the users’ DSL group.
When deploying a new service, the password to access it (which is automatically generated) is directly stored here, so that the user can access it any time by clicking on the correspondent record:
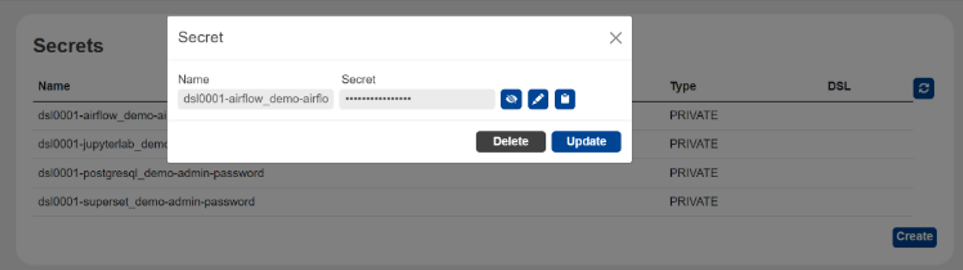
NB: Please note that passwords to access the deployed services can be modified and updated from the UI, but that does NOT imply an actual change of the access credential. In other words, resources’ passwords cannot be changed, only custom-created secrets can be edited.
The users can also register a custom secret by clicking on create and fulfilling the required fields. The generated secrets can be then kept private or shared with the whole DSL group.
6) Admin#
This section is visible only by the administrator of the DSL, and give DSL admins the possibility to manage other users and DSLs:
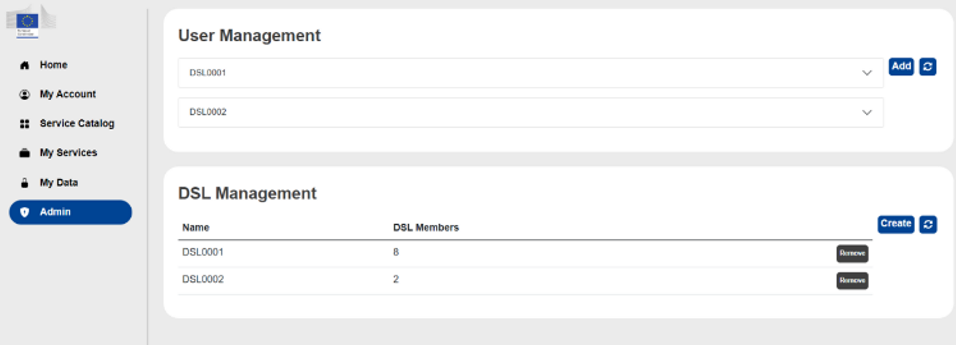
- User Management - DSL admins can add/remove existing users to/from existing DSLs.
- DSL Management – DSL admins can create/remove new/existing DSLs.
7) Logout#
By clicking on this component, the user is logged out from the portal.
8) Version#
This indicates the version of the current portal’s release
Secrets#
Secrets are key-value pairs which are stored in the vault, the key represents the name of the secret, and the value represents the value of the secret. They fall under one of two categories Private and Shared. Private secrets can only be seen by the user who creates them, while Shared secrets are shared with all the members of a certain group.
Please only store secrets related to your deployments, e.g. tokens.
Creating a secret#
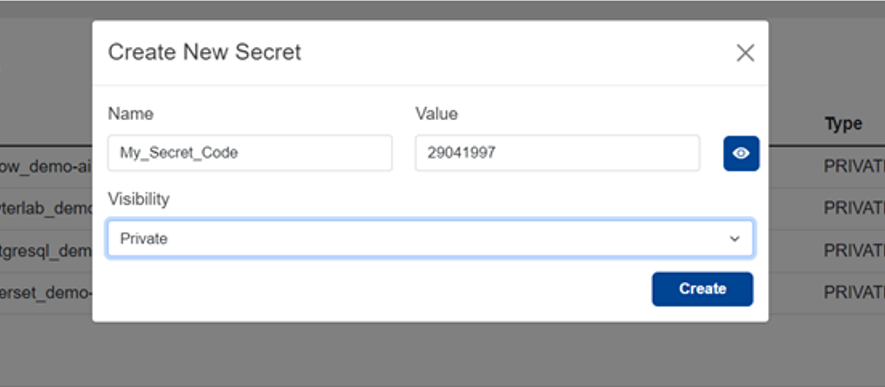
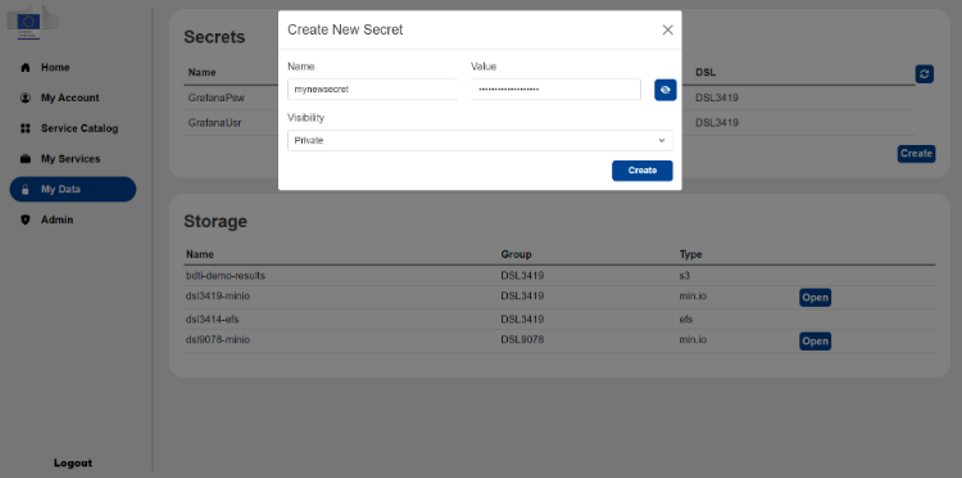
To create a new secret, first navigate to the My Data page, there the user will see the Secrets panel. Press the Create button.
A popup will appear to create a new secret, the user will have 3 inputs to determine. The Name and Value represents the name and value of the secret respectively. Visibility determines whether the secret should be private or shared, for shared secrets the user must choose a group to share the secret with. The user can toggle the view/hide button to show or hide the secret.
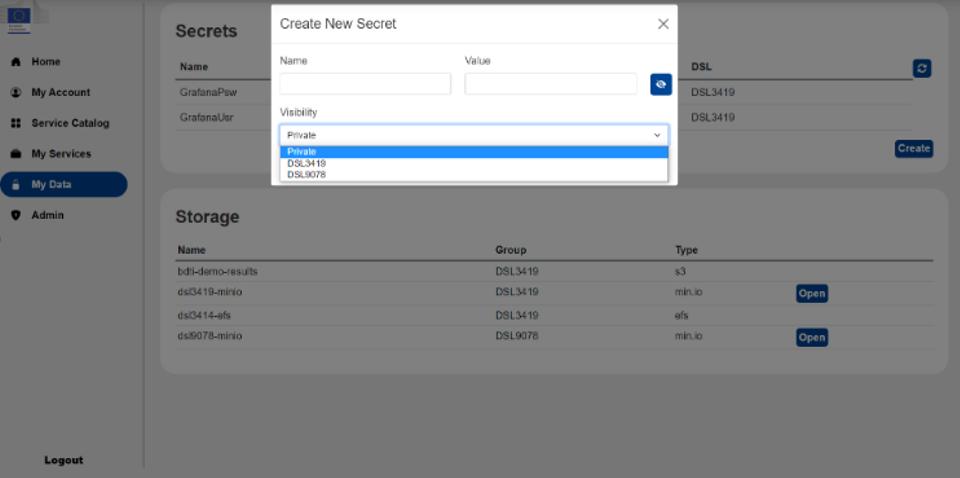
Once the user has filled out the 3 inputs, press the Create button to create the secret.
Viewing a secret#
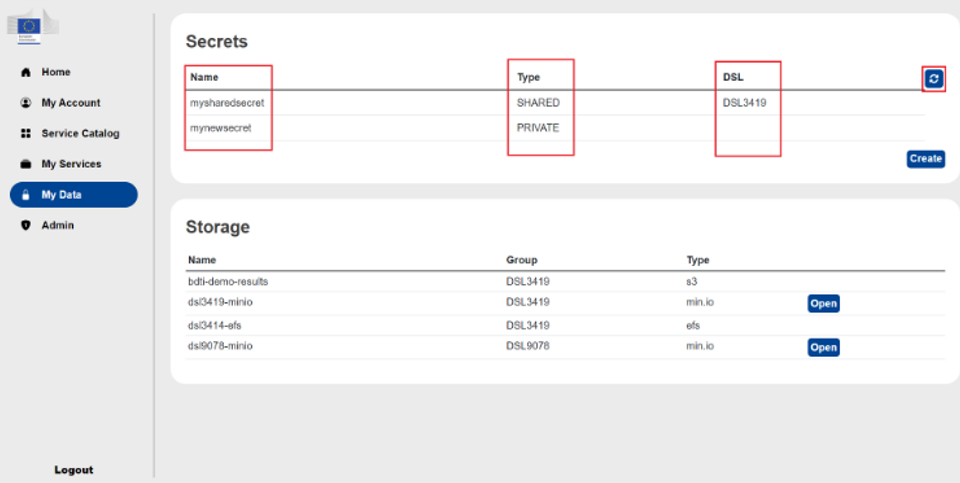
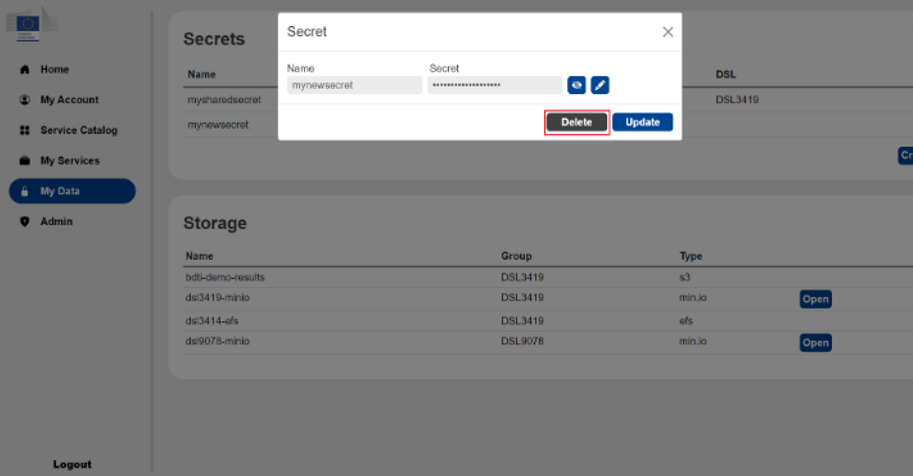
The user can see all of their secrets, both private and those shared in a group they belong to in a table. This table show the secret's name, whether it is private or shared, and the group it belongs to if it is shared. There is also a reload button on the top right of the table, which allows the user to reload the secrets list.
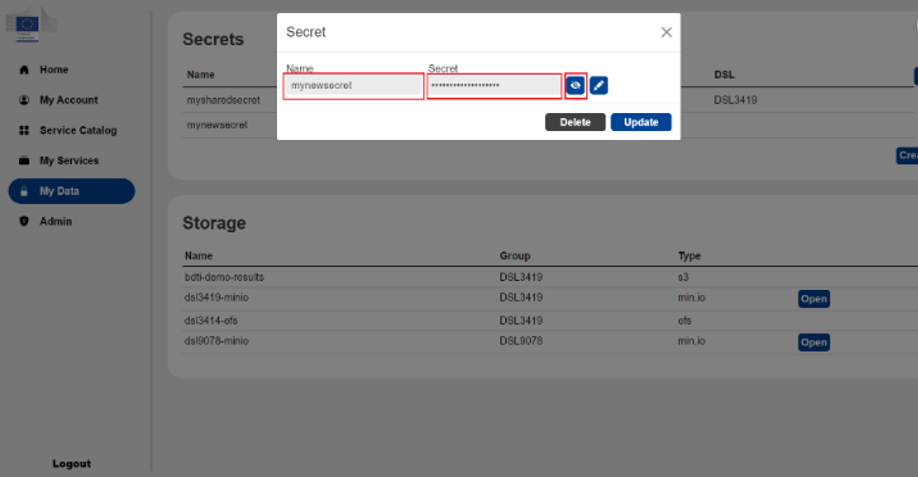
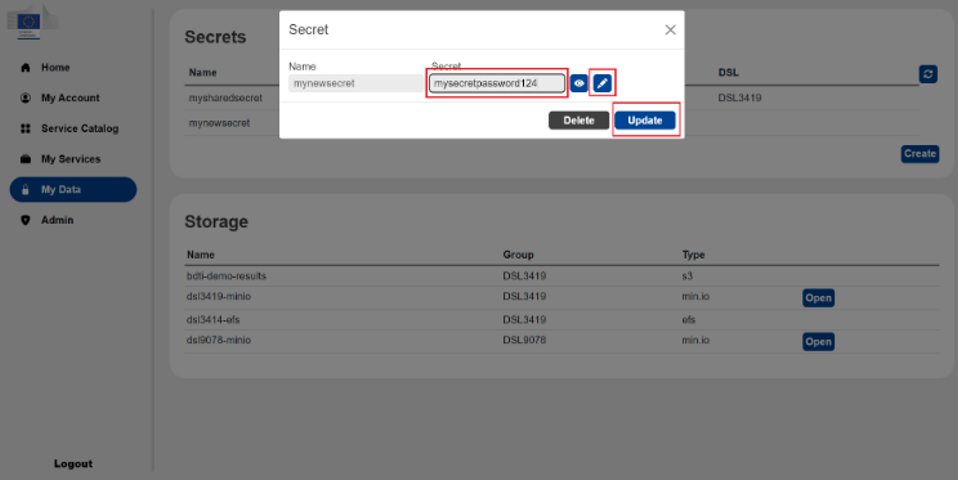
To view the secret's value, the user can click on the secret. By default the secret is hidden, however by pressing the view/hide button, the user can view or hide the secret.
Updating a secret#
To update a secret, the user must press on the edit button first, they will then be able to edit the secret's value. Once the secret has been edited, the user can press the Update button.
Deleting a secret#
To delete a secret, the user simply needs to press the Delete button.
Storage#
The storage panel contains a table of all the storage the user has access to. The leftmost column shows the name of the storage options, the second column shows the group the storage options belong to, and finally the third columns shows the type of storage options. There are 2 types of storage options, EFS (Elastic File System and AWS S3 bucket.
The EFS (Elastic File System storage is the persistent network file system disk option which is used by the deployments to store user data. AWS S3 is an object storage solution to store a variety of data types and formats and can be used as ingestion layer or data lake for example.
Launch a new service#
This section will guide the user in deploying a new service – a JupyterLab instance – to better understand how this process works. Please note that the configuration for the other services may be slightly different, but the general approach and procedure is basically the same, hence replicable by following this example.
1) Go to the Service Catalog section of the portal.
2) Click on the Launch button for the JupyterLab service.
3) A configuration modal for the service will pop up on the screen. The following configuration fields are requested:
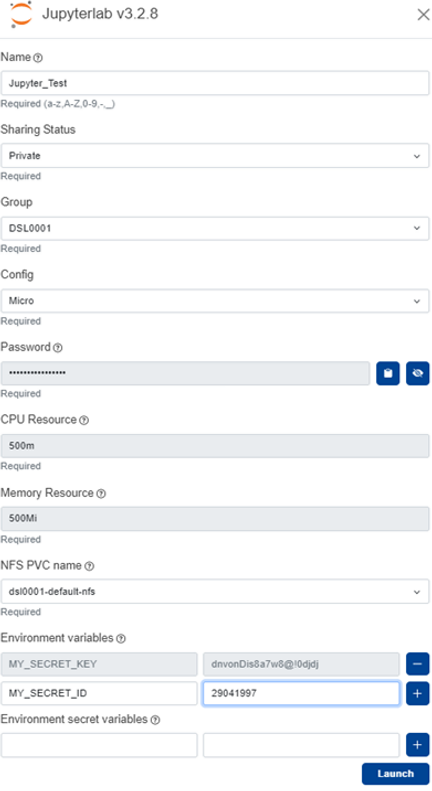
- Name: this is the name/alias that the user wants to assign to the new deployment (i.e. Jupyter_Test)
- Sharing Status: the user should select whether the deployment is private (only the user who is launching the service can see/access it) or shared with all other DSL members.
- Group: the user should select which DSL group to associate with the deployment
- Config: a set of pre-made configurations (i.e. Micro, Public Sharing, ...) are made available for the different services. In alternative, the user could opt for a Custom configuration, thus customising the capacity to be allocated.
- Password: this field is not editable – contains the auto-generated password to access the instance. After launching the service, its password is automatically stored in the My Data section of the portal.
- CPU Resource/Memory Resource: this is the capacity to allocate to the new instance. If a pre-made configuration is selected, these fields are not editable.
- NFS PVC name: the user should select an NFS volume to associate to the instance (i.e. dsl0001-default-nfs)
- Environment variables/secret: in this configuration fields, the user can specify a set of environment variables to inject.
4) When the configuration has been completed, click on Launch to deploy the service.
5) Go to the My Services section of the portal.
6) The services just launched in Step 5 should be visible here. The status of the deployment will be in the PENDING STATE:
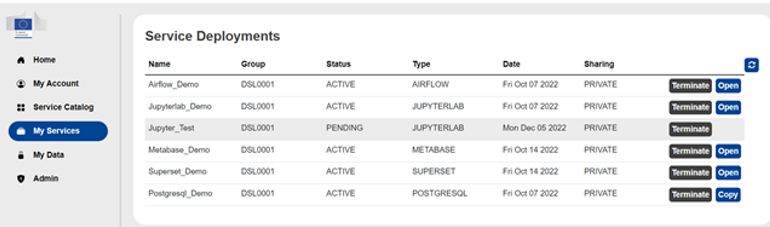
7) After a while, the service should successfully deploy, and its status should change to ACTIVE:
8) At this point, the user can access the deployed service by clicking on the open button. Please note that the password can be retrieved from the My Data section of the portal.
9) The service can be successfully accessed and used directly from the portal UI: