Accessing additional services
In this section, more information can be found on how to access the services available outside of the Cloud-Accelerated portal (e.g., AWS SageMaker, AWS Workspaces, etc.). These resources cannot be accessed from the public internet and require access to the EC Data Platform network. Depending on the service, several options are available for making a connection:
- AWS ClientVPN (e.g., Amazon WorkSpaces, Amazon EC2, Amazon API calls)
- Bastion Host (e.g., Amazon EC2, Amazon API calls)
- Amazon Workspaces (e.g., AWS EC2, Amazon API calls)
- AWS CLI (leveraging AWS Credentials to make Amazon API calls)
- Public endpoint (to access a data science studio)
The setup of these authentication methods is presented in the sections below.
Note that required information on the services accessible directly from the portal is presented already in section Cloud Accelerated Portal Services.
AWS Client VPN#
- User needs: Governance, Security & Connectivity
- User profiles: Data Scientists, Data Engineers
- Assumed user knowledge: Basic knowledge about VPN connection problem-solving.
When you want to connect to the private network of ECDP from a local desktop that allows OpenVPN connections, you can use AWS Client VPN to establish a secure connection to the private ECDP network. When connected; you can directly connect to private resources from your local desktop.
Using AWS Client VPN to access private resources#
Installing AWS Client VPN#
Amazon WorkSpaces is freely available through aws.amazon.com. Please go to the following link to download the client: https://aws.amazon.com/vpn/client-vpn-download/. After downloading the client, follow the installation instructions. When the installation is finished you are ready to sign in.
Sign-in into AWS Client VPN#
Start the client that you just downloaded and create a profile in AWS Client VPN by following “File > Manage Profiles”. Enter a display name and add the VPN Configuration file. This configuration file will be distributed to users after deployment. Once a profile has been added, click on “Connect” and enter your ec-dataplatform.eu credentials. The username you will be asked to provide is simply the beginning of your ECDP email address. Example: test123@ec-dataplatform.eu –> username = test123
Access resources via the browser#
If resources that you requested host web interfaces, you can access these via a browser (Google Chrome, Mozilla Firefox). E.g. by navigating to the IP address of the DSVM, which hosts the JupyterHub on the https port.
Bastion Host#
- User needs: Governance, Security & Connectivity
- User profiles: Data Scientists, Data Engineers
- Assumed user knowledge: Basic knowledge about bastion hosts and SSH tunneling.
You can connect to different deployed components via the Bastion Host. A default bastion host is provided that allows you to access the ECDP private network resources via SSH tunneling. SSH is available on port 22 and user accounts on the Bastion Hosts are synced with the Azure AD. You can use your ec-dataplatform.eu accounts to access Amazon WorkSpaces. Bastion Hosts can only be accessed by the AD groups. If you want to access web interfaces that are deployed in the ECDP network, you will need to forward the IP/DNS of the web interface and the port where it is hosted (HTTP:80, HTTPS:443, Apache Hue:8888, …) to your local desktop via SSH tunneling. You can also use the Bastion Host as a jump host to SSH into private resources that have port 22 open.
Using the Bastion Host to access private resources#
Access web interfaces via SSH (PuTTY example)#
Use these steps if you want to access web interfaces from your local desktop that are deployed in the ECDP network (e.g. Apache Hue, Data Science Studio, Kibana).
- Download and install PuTTY (https://www.putty.org/)
- In the ‘Session’ tab, enter as Host Name: IP address of the Bastion Host
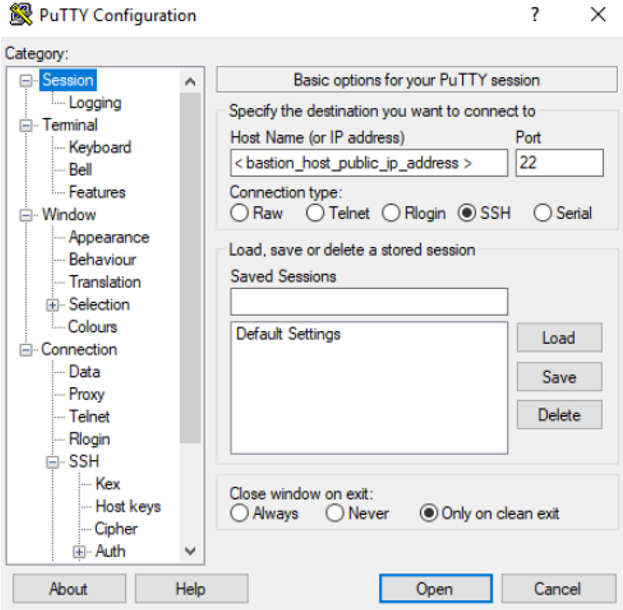
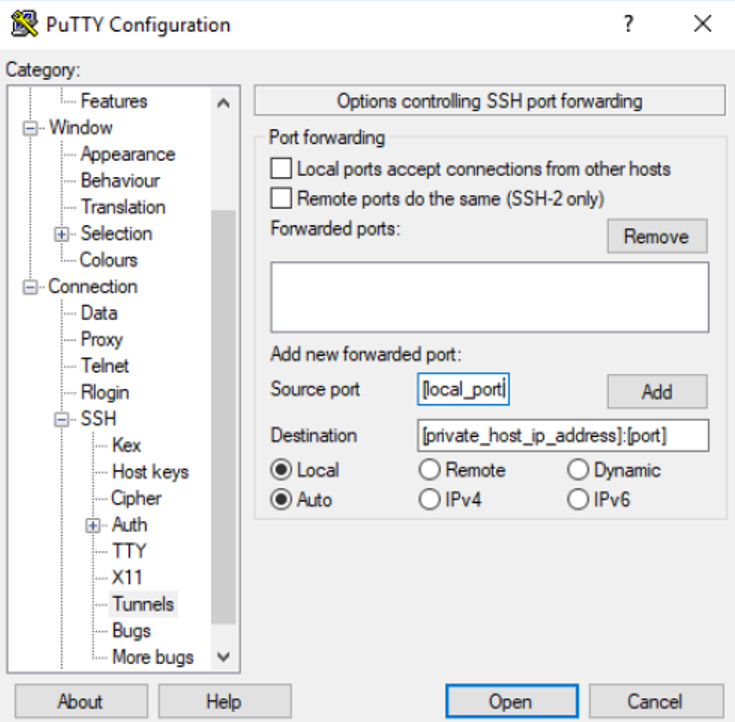
- Go to tab “Connection – SSH – Tunnels”.
- Enter as Destination,
private_host_ip_address:port. - port: This is the port where the web interface is running on. For regular web applications that use HTTPS, use port 443. If a specific port is mentioned in the documentation of the resource, use that port. For example, Apache Hue uses port 8888.
- Enter as
Source port: local_port, an available free port on your local system (e.g. 10000) - Click on Add
Initializing AWS Credentials#
- User needs: Governance, Security & Connectivity
- User profiles: Data Scientists, Data Engineers
- Assumed user knowledge: how to use the command-line to install and use packages, how to add Windows environment variables (for WorkSpaces)
EC Data Platform provides users the ability to directly use AWS services via their respective API’s. Examples of services are currently supported:
- Amazon S3
- Amazon Athena
To use those services, a user needs to have permissions to execute API calls. A user can obtain permissions in two ways:
- Obtaining temporary AWS credentials on your local desktop/WorkSpace by using your ec-dataplatform.eu account (Initializing AWS credentials).
- Obtaining permissions by using a deployed resource that has these permissions attached. For example, if an Amazon EC2 has permissions to access an Amazon S3 bucket, users can execute jobs on this cluster that have access to Amazon S3.
This guide covers the first option. Initializing AWS credentials requires configuring your local desktop, laptop, or Amazon WorkSpaces with AWS credentials. As a user, you will need to initialize these credentials via aws-azure-login. This tool will sign you in to the ec-dataplatform.eu Active Directory and will initialize your local machine with valid AWS credentials via SSO. Depending on what permissions were requested, a role will be attached to your AWS credentials. After successful initialization, you will be able to execute AWS CLI commands or use an AWS SDK such as boto3.
References:
- https://github.com/sportradar/aws-azure-login
- https://aws.amazon.com/cli/
- https://boto3.amazonaws.com/v1/documentation/api/latest/index.html
Installing Node.js#
Note: this can be skipped for Amazon WorkSpaces
- AWS-Azure-Login is available as a npm package. Installing this package requires you to install Node.js. Node.js v7.6.0 or later.
-
If you run into an issue where npm packages (such as aws-azure-login) are not being recognized by your command line, you might need to add the npm install location to your path. Practically, that means:
- In Command Prompt, enter “npm config get prefix”.
- This will return the install location for npm packages. Copy the output
- In the Windows search bar, search for “environment”, and go to “Edit environment variables for your account”
- Find the “PATH” variable and hit edit
- Add the output from the “npm config get prefix” command you previously ran
- Restart your command prompt
Installing AWS-Azure-Login#
You need to install aws-azure-login via npm if you are in Amazon WorkSpaces or on your local machine. Installation instructions are given for Windows desktops. For Linux desktops, please refer to the installation guide of aws-azure-login (https://github.com/sportradar/aws-azure-login).
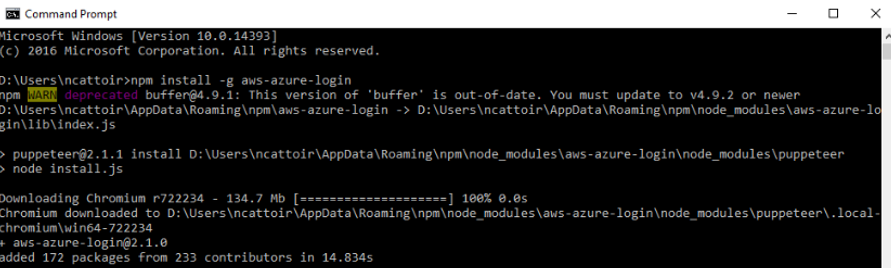
- Open Command Prompt by entering “cmd” and pressing “Enter” in the start menu of Windows.
- In Command Prompt, enter “npm install –g aws-azure-login”.
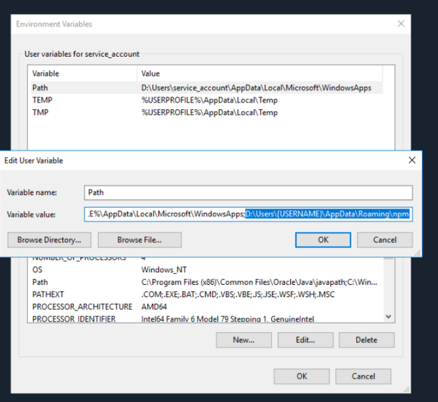
- After the installation is complete (see screenshot with successful installation), you need to add the path of npm packages to the Windows environment variables. This is done to enable using aws-azure-login without adding the path of the package to the command when executing from the command prompt. If you are using your local desktop and not Amazon WorkSpaces, you will need to verify if you can execute npm packages with or without the path.
- For Amazon WorkSpaces: Enter “env” in the start menu of Windows and open “Edit the system environment variables”
- Open “Edit the system environment variables”
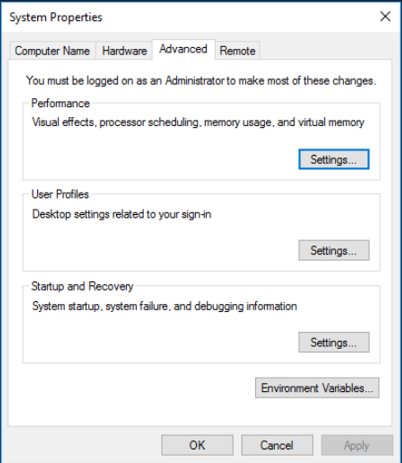
- Click on “Environment Variables”
- Click on “Path” and then on “Edit…”
- Add “D:” after “…WindowsApps;” (Replace USERNAME with your username)
- Click on "Ok".
- Add the path to npm to Windows Path
Configuring AWS-Azure-Login#
-
Configure your user profile by entering “aws-azure-login –configure” in command prompt.
- Azure Tenant ID: Communicated by EC Data Platform team
- Azure App ID URI: Communicated by EC Data Platform team
- Default Username: username@ecdataplatform.eu
-
You can use the default vales for the next configurations without issues. Replace username with your login name.
Initializing AWS credentials with AWS-Azure-Login#
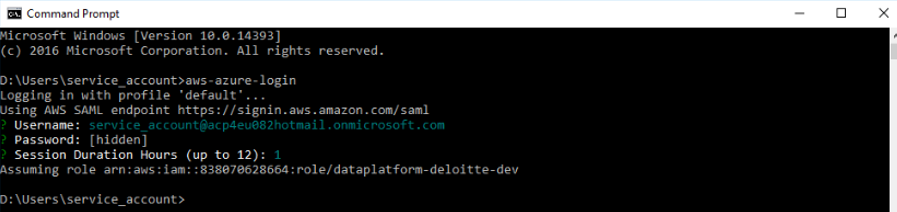
- Enter “aws-azure-login” in the command prompt.
- Enter your account (username@ec-dataplatform.eu) and your user password.
- After successfully initializing an AWS role on your local machine or Amazon WorkSpaces you are able to access AWS services that are attached to your account via AWS CLI or AWS SDK. The local AWS credentials file is updated with initialized AWS keys.
- Initialize AWS credentials with aws-azure-login
Public Endpoint#
Accessing Data Science Studio via ALB
- User needs: Connect to an EC2 machine which host tools like Jupyter, RStudio,…
- User profiles: Data Scientists, Data Engineers
- Assumed user knowledge: -
The Data Science Studio has been implemented with a DSN Record and Application Load Balancer so there’s a straight-forward way to access this resource.
- Go your dsl-specific link (which is in the following format
https://dss-dslxxxx.ecdp.dataplatform.tech.ec.europa.eu/) - You will be prompted to provide your EC Data Platform Credentials public endpoint

- You will need to choose which service you want to access (Desktop, Jupyter Notebook, Rstudio…)
- You’re now connected to your Data Science Studio